SVG
[SVG规范] SVG - MDN
Scalable Vector Graphics (SVG) 2 - W3C
SVG 教程 - MDN
SVG 元素参考 - MDN
SVG 属性参考 - MDN
SVG 接口参考 - MDN
SVG 工具 - MDN
目录
1.1 基础
1.1.1 SVG 的基本形式
SVG 可直接潜入 HTML 代码中,也可作为单独文件使用
SVG 的基本形式:
<svg version="1.1"
     baseProfile="full"
     width="300" height="200"
     xmlns="http://www.w3.org/2000/svg">
</svg>
SVG 作为单独文件时为 xml 文件,后缀 .svg 或 .svgz(压缩格式,由于兼容性原因,不推荐使用)
SVG 文件的受用:
<!-- 兼容性较好 -->
<!-- object -->
<object data="image.svg" type="image/svg+xml" />
<!-- iframe -->
<iframe src="image.svg"></iframe>

<!-- 低于4.0版本的Firefox 中不起作用 -->
<!-- image -->
<img srv="image.svg">
SVG 直接嵌入 HTML - 直接将 SVG 文件的内容写入 HTML 中(支持 HTML5 时才可生效)
<svg version="1.1"
     baseProfile="full"
     width="300" height="200"
     xmlns="http://www.w3.org/2000/svg">
</svg>
1.1.2 SVG 的 世界 视野 视窗
- 世界是无穷大的
- 视野是观潮世界的窗口
- SVG 中 使用 viewBox 控制视野
width,height- 控制视窗- SVG 代码 - 定义世界
viewBox,preserveAspectRatio- 控制视野
- SVG 标签中可定义宽(
width)高(height)来表示 SVG 渲染的区域大小(视窗),也可使用央视表定义。视窗是浏览器用来渲染 SVG 内容的区域。- SVG 中的内容就是在定义世界,SVG 中显示的线条,图形,颜色,样式都是在定义世界。
- 观看世界的矩形区域就是视野,使用
viewBox定义理想情况下 视窗和视野尺寸一致,浏览器可以完美的将视野填充到视窗内;如果视窗与视野的尺寸不一致,就有如何填充的问题,可使用
preserveAspectRatio控制。
1.1.3 SVG 的图形分组
<g /> - 把属性赋给一整个元素集合。这是它唯一的目的。
<g fill="red">
  <rect x="0" y="0" width="10" height="10" />
  <rect x="20" y="0" width="10" height="10" />
</g>
1.1.4 坐标系统
SVG 的 坐标与 Canvas 的坐标相同(计算机的绘图系统基本采用相同的坐标系统),但与数学中的坐标有较大差异。
- 坐标点:以页面的左上角为 (0,0) 坐标点
- 单位:坐标以像素为单位
- x 轴正方向:x 轴正方向是向右
- y 轴正方向:y 轴正方向是向下
1.1.5 四种坐标系
- 用户坐标系:也叫做原始坐标系,基于世界的坐标系,视野的定义时基于用户坐标系的
- 自身坐标系:每一个图形或者分组都会产生一个自身坐标系,自身坐标系用于定义一些自身属性
- 前驱坐标系:父容器的坐标系,前驱坐标系通过 transform 变换之后形成图形的自身坐标系
- 参考坐标系:对一个图形进行观潮测量时使用的坐标系
1.1.6 坐标变换
1.1.6.1 定义
- 数学上坐标变换:通过一定的方法将一个坐标系的坐标转换为另一个坐标系的坐标的过程
- SVG上的坐标:对一个到另一个坐标系的变换的描述
1.1.6.2 线性变换
线性变换方程:
x` = ax + cy + e
y` = bx + dy + f
变换矩阵:
|a c e|
|b d f|
|0 0 1|
1.1.6.3 平移
···text
x = 1x + 0y + 10
y = 0x + 1y + 10
|1 0 10| |0 1 10| |0 0 1| ···
1.1.6.4 旋转
使用极坐标变换矩阵
极坐标方程:
x = r*cos(α)
x = r*sin(α)
旋转 θ 度
x = r*cos(α + θ)
x = r*sin(α + θ)

X'=r⋅cos(α)cos(θ) − r⋅sin(α)sin(θ) = cos(θ)X − sin(θ)Y + 0
Y'=r⋅cos(α)sin(θ) + r⋅sin(α)cos(θ) = sin(θ)X + cos(θ)Y + 0

|cos(θ) -sin(θ) 0|
|sin(θ) cos(θ)  0|
|0      0       1|
1.1.6.5 缩放
1.1.6.6 transform 属性
定义前驱坐标系到⾃自⾝身坐标系的线性变换
rotate(<deg>)translate(<x>,<y>)scale(<sx>,<sy>)matrix(<a>,<b>,<c>,<d>,<e>,<f>)
transform - MDN
Chapter 8: Coordinate Systems, Transformations and Units - W3C
所有接下来的变形都会用一个元素的 transform 属性总结。变形可以连缀,只要把它们连接起来就行,用空格隔开。
如果使用了变形,你会在元素内部建立了一个新的坐标系统,应用了这些变形,你为该元素和它的子元素指定的单位可能不是 1:1 像素映射。但是依然会根据这个变形进行歪曲、斜切、转换、缩放操作。
SVG 允许你无缝嵌入别的 SVG 元素。因此你可以利用内部 SVG 元素的属性viewBox、属性 width 和属性 height 简单创建一个新的坐标系统。
<!-- 矩形将是指定的两倍大 -->
<svg xmlns="http://www.w3.org/2000/svg" version="1.1">
  <svg width="100" height="100" viewBox="0 0 50 50">
    <rect width="50" height="50" />
  </svg>
</svg>
- 平移
translate(x, y)- 把元素移动一段距离,甚至可以根据相应的属性定位它。如果y没有指定,默认为0。
<rect x="0" y="0" width="10" height="10" transform="translate(30,40)" />
- 旋转
rotate(deg)- 旋转一个元素。值是用角度数指定的。
<rect x="20" y="20" width="20" height="20" transform="rotate(45)" />
- 斜切
skewX(deg)/skewY(deg)- 利用一个矩形制作一个斜菱形。每个值都是用角度数指定的。 - 缩放
scale()- 改变元素的尺寸。它需要两个数字,作为比率计算如何缩放。0.5 表示收缩到 50%。如果忽略第二个数字,默认等于第一个值。 - 复杂变形
matrix()- 所有上面的变形可以表达为一个 2x3 的变形矩阵。可以直接用matrix(a, b, c, d, e, f)变形组合一些变形,设置结果矩阵。
1.1.7 坐标观察
getBBox()获得当前元素所占的矩形区域getCTM()获得视窗坐标系到当前元素⾃自⾝身坐标系的变换矩阵getScreenCTM()获得浏览器坐标系到当前元素⾃自⾝身坐标系的变换矩阵getTransformToElement()获得从指定元素的⾃自⾝身坐标系到当前元素的⾃自⾝身坐标系的变换矩阵
2.1 基本形状
2.1.1 矩形 - <rect>
x- 矩形左上角的 x 位置y- 矩形左上角的 y 位置width- 矩形的宽度height- 矩形的高度rx- 圆角的 x 方位的半径ry- 圆角的 y 方位的半径
2.1 基本形状 矩形
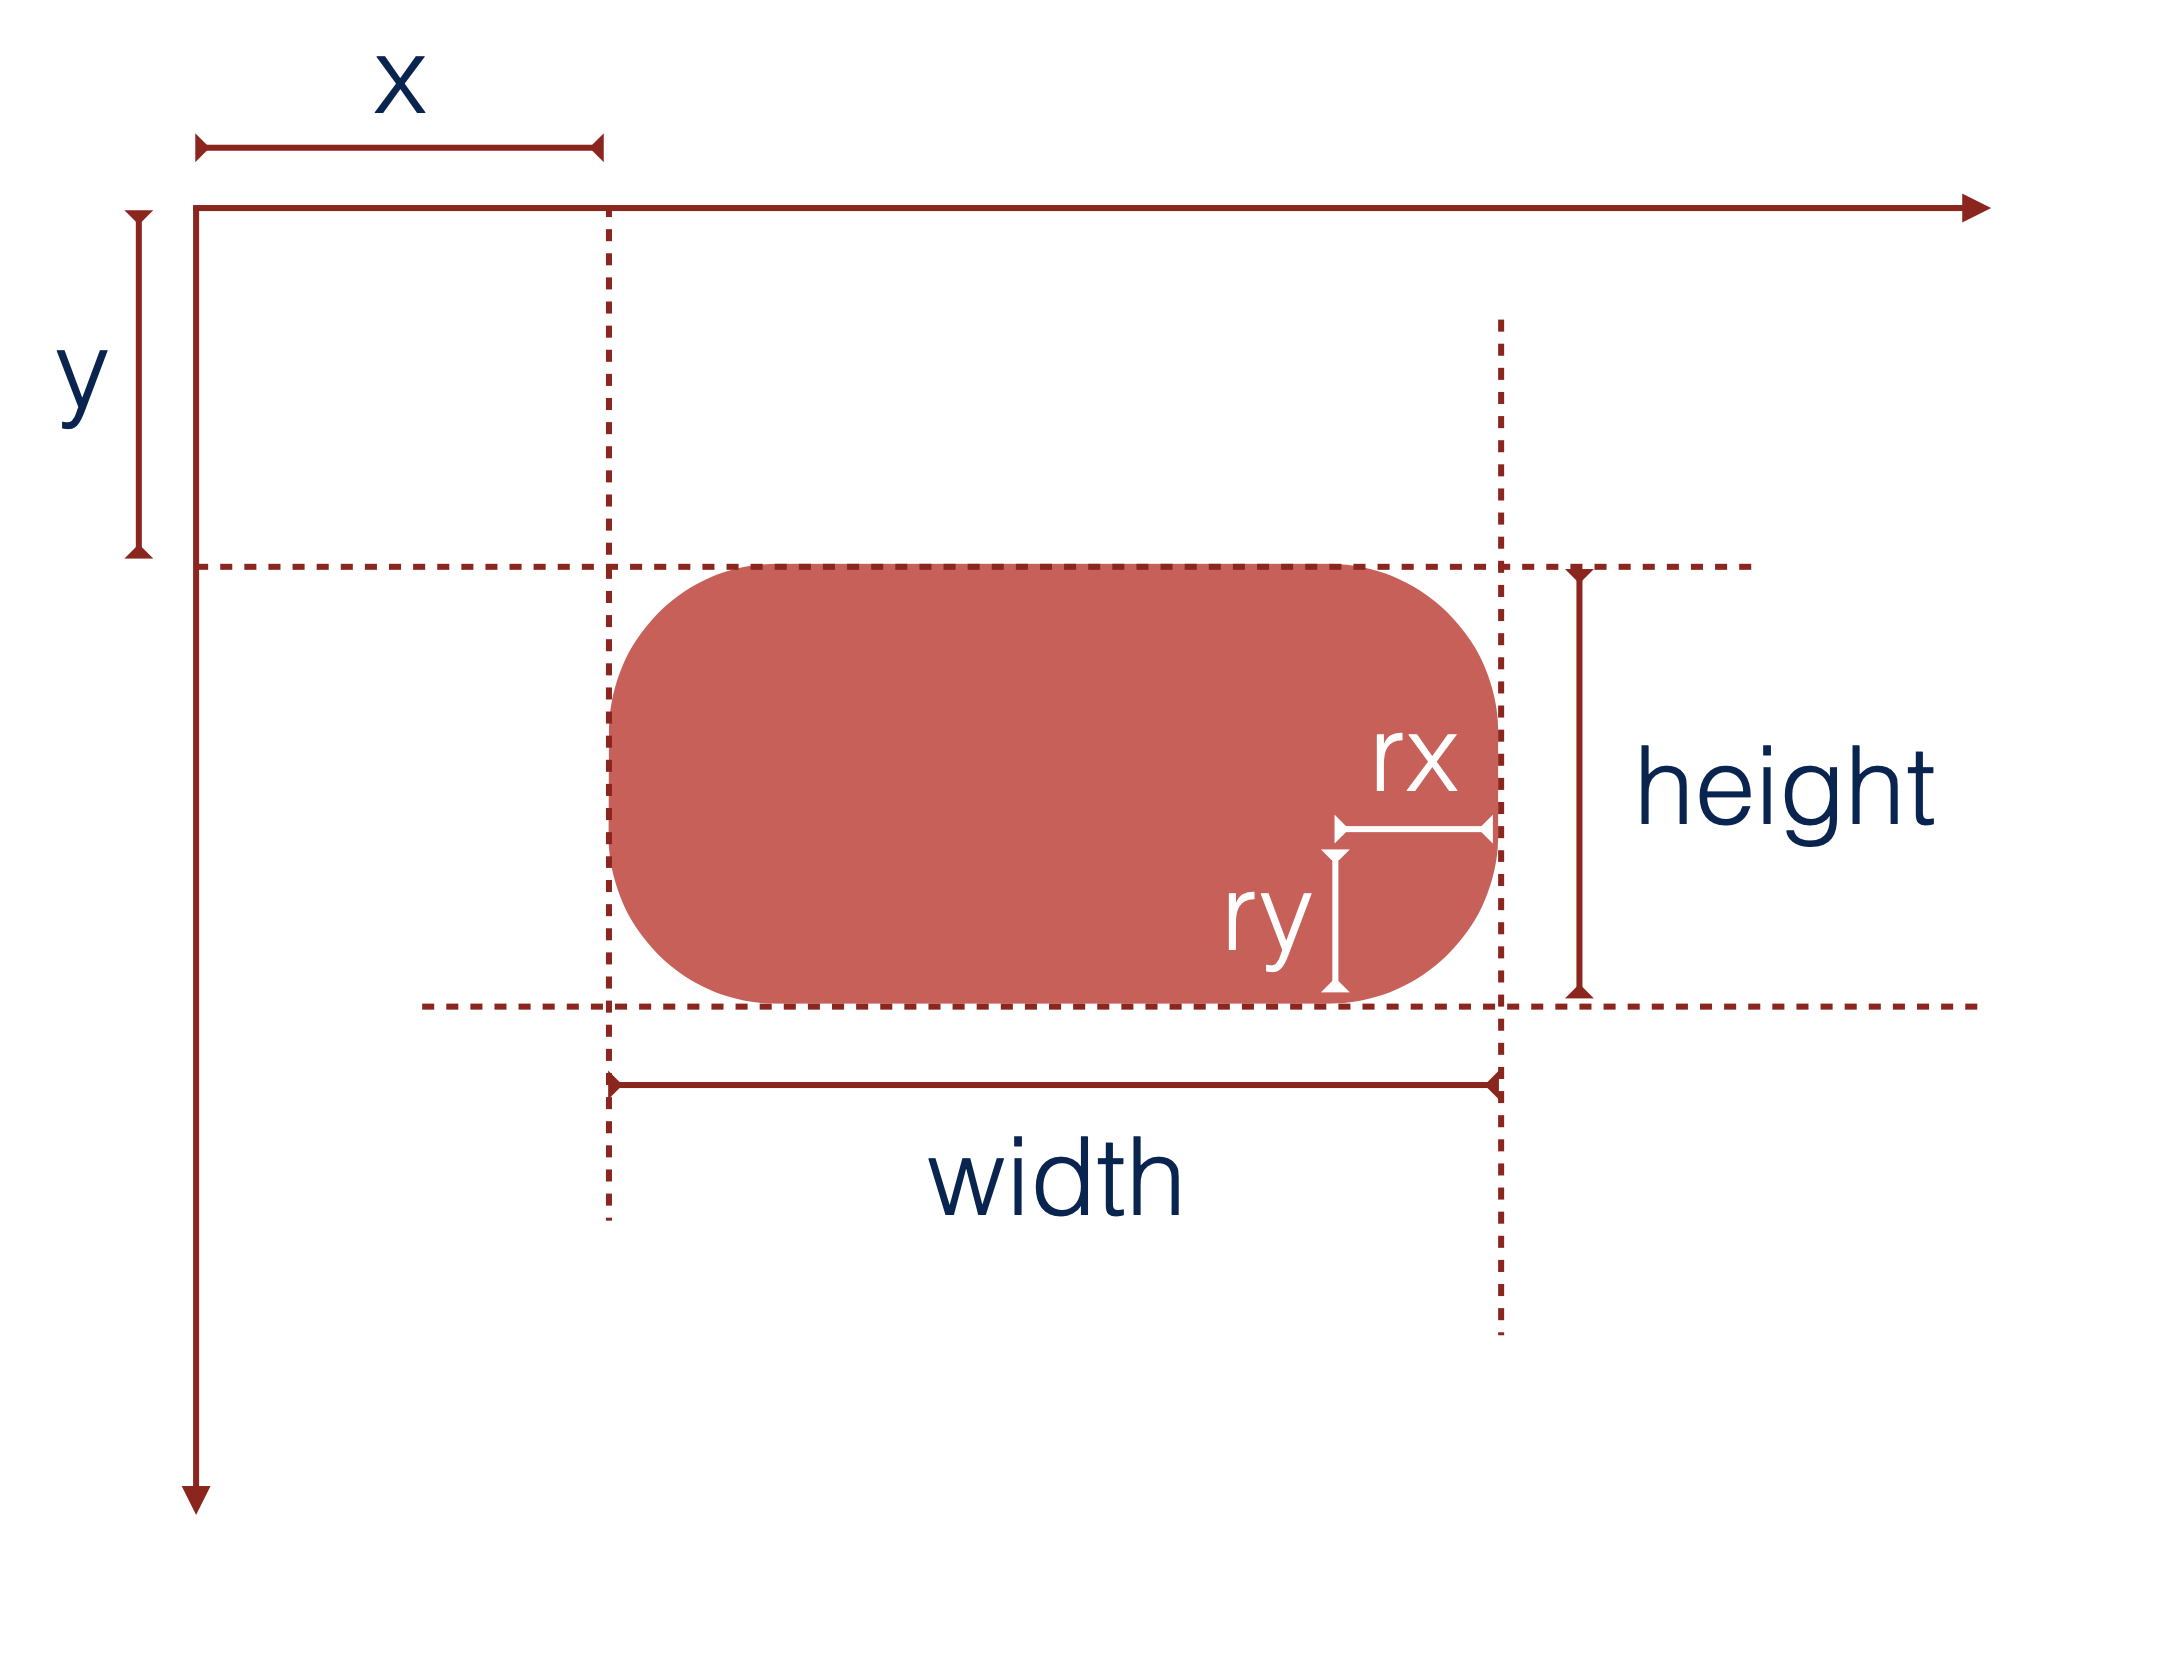
<rect x="10" y="10" width="30" height="30" />
<rect x="60" y="10" rx="10" ry="10" width="30" height="30" />
2.1.2 圆形 - <circle>
r- 圆的半径cx- 圆心的 x 位置cy- 圆心的 y 位置
2.1 基本形状 圆形
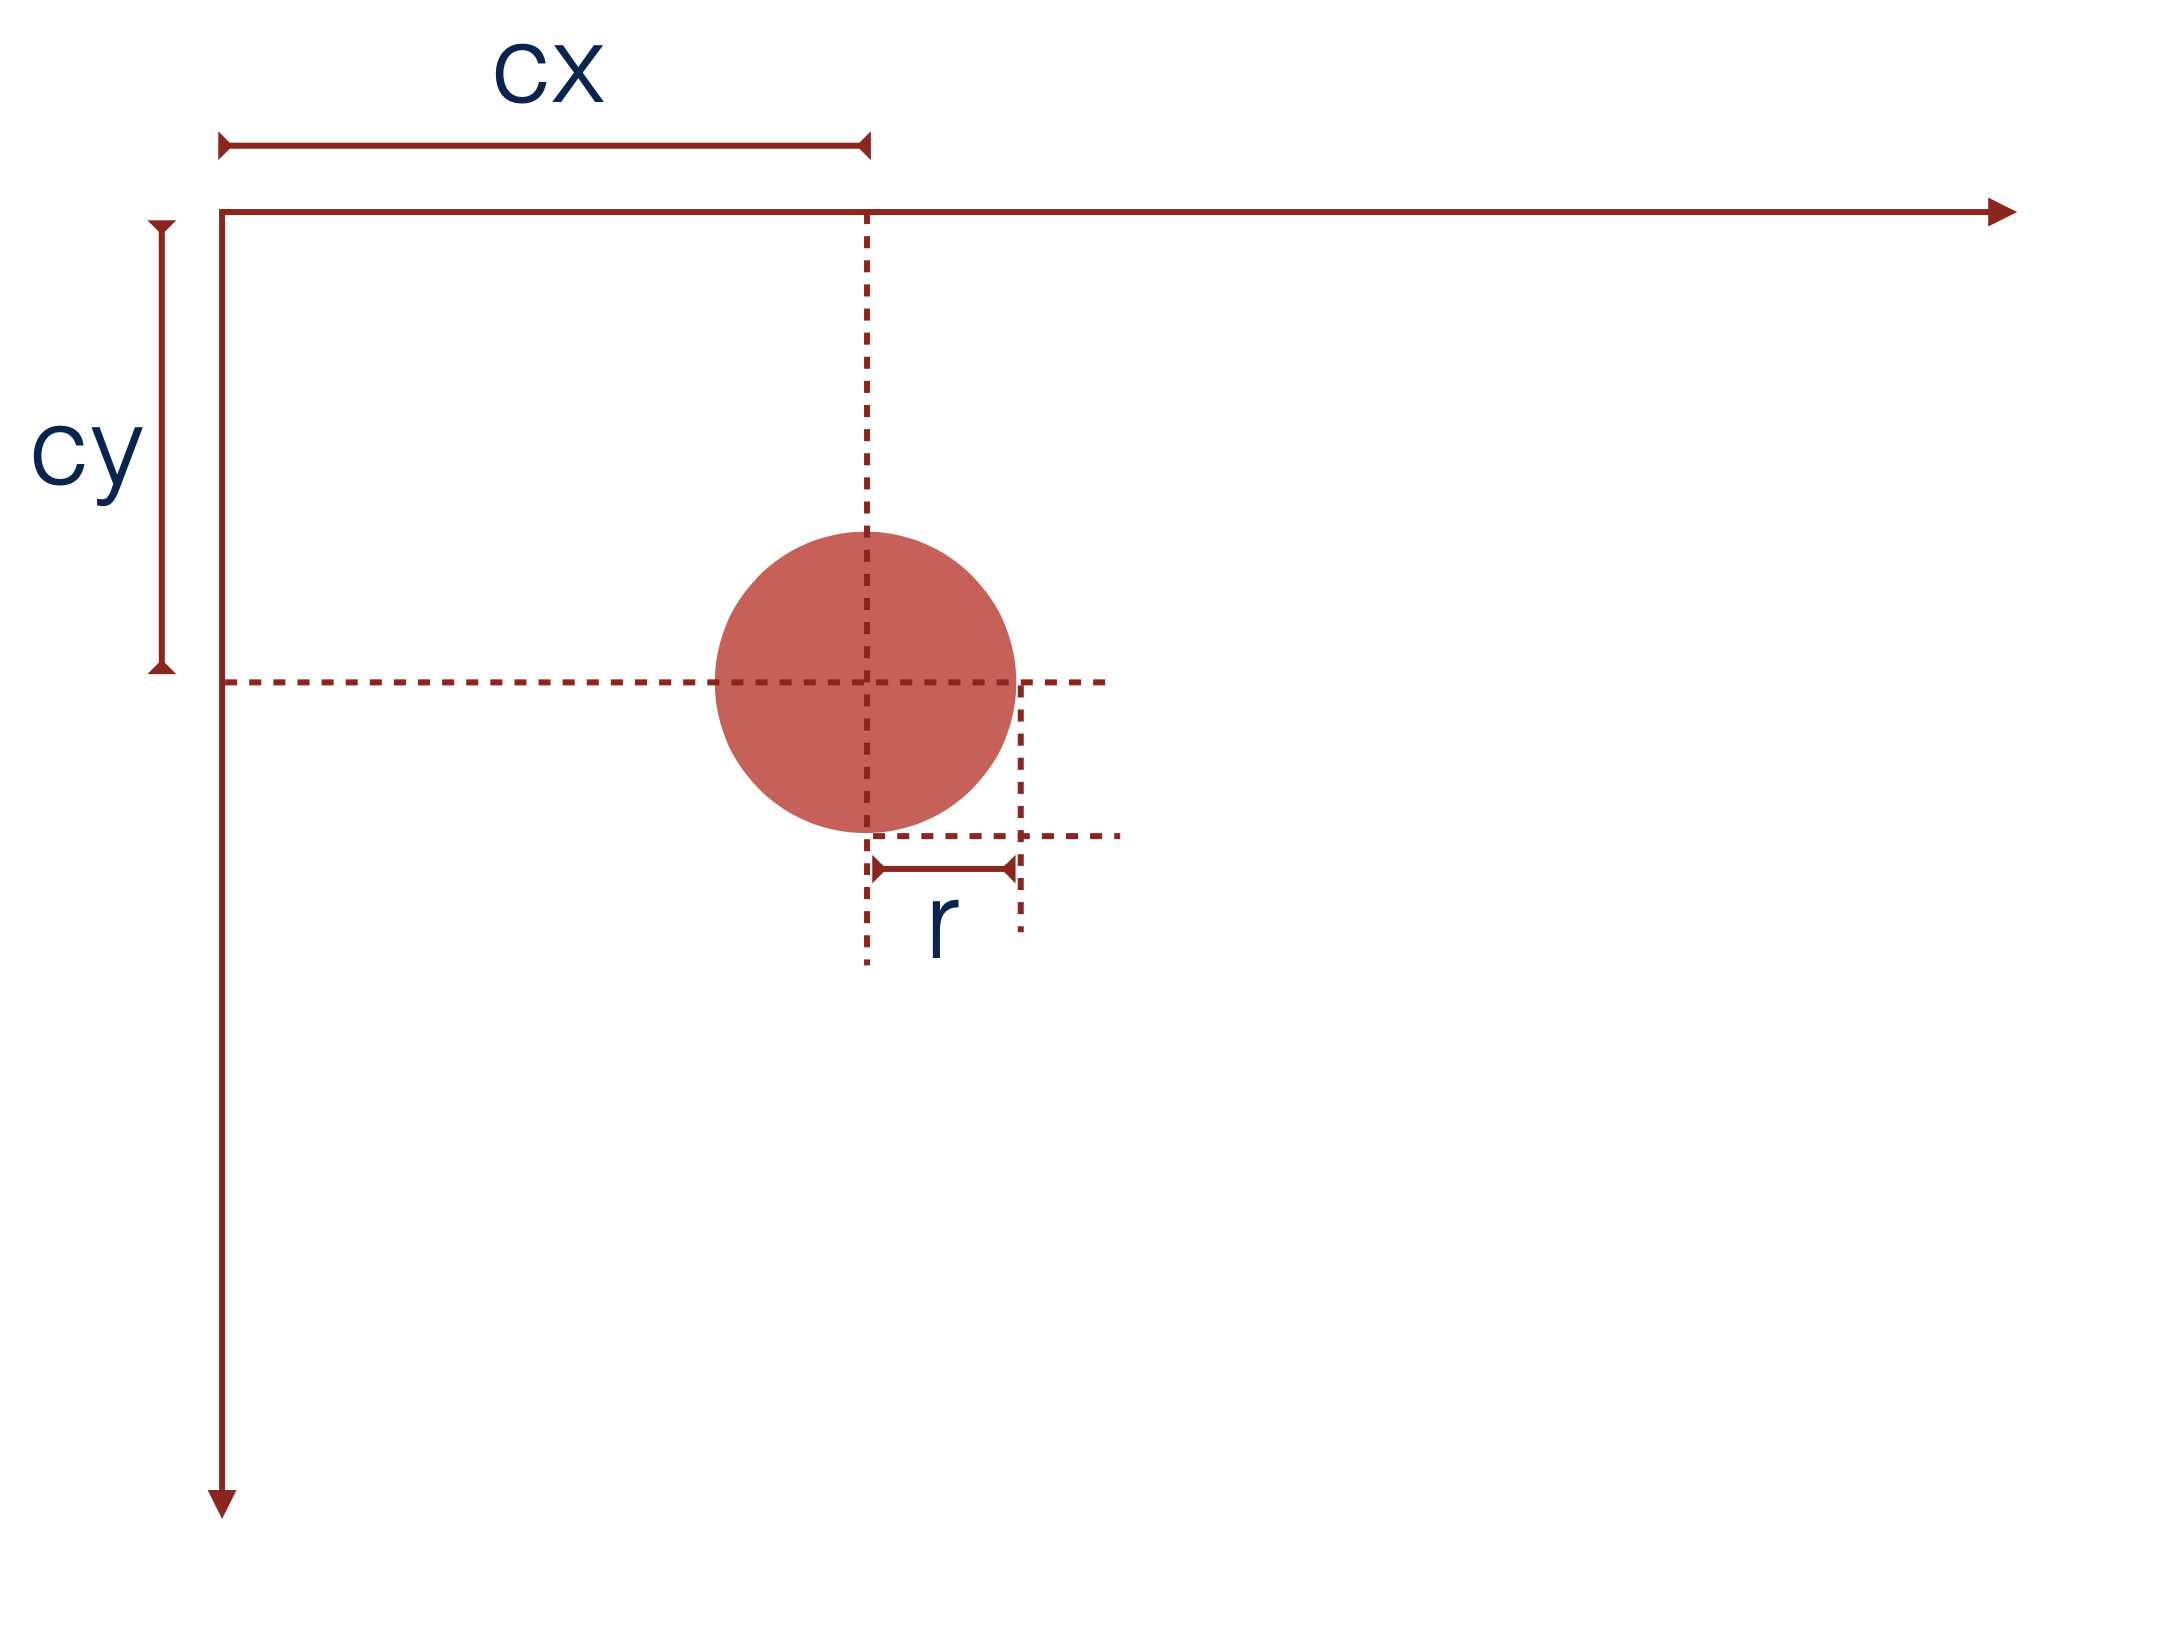
<circle cx="25" cy="75" r="20" />
2.1.3 椭圆 - <ellipse>
rx- 椭圆的 x 半径ry- 椭圆的 y 半径cx- 椭圆中心的 x 位置cy- 椭圆中心的 y 位置
2.1 基本形状 椭圆
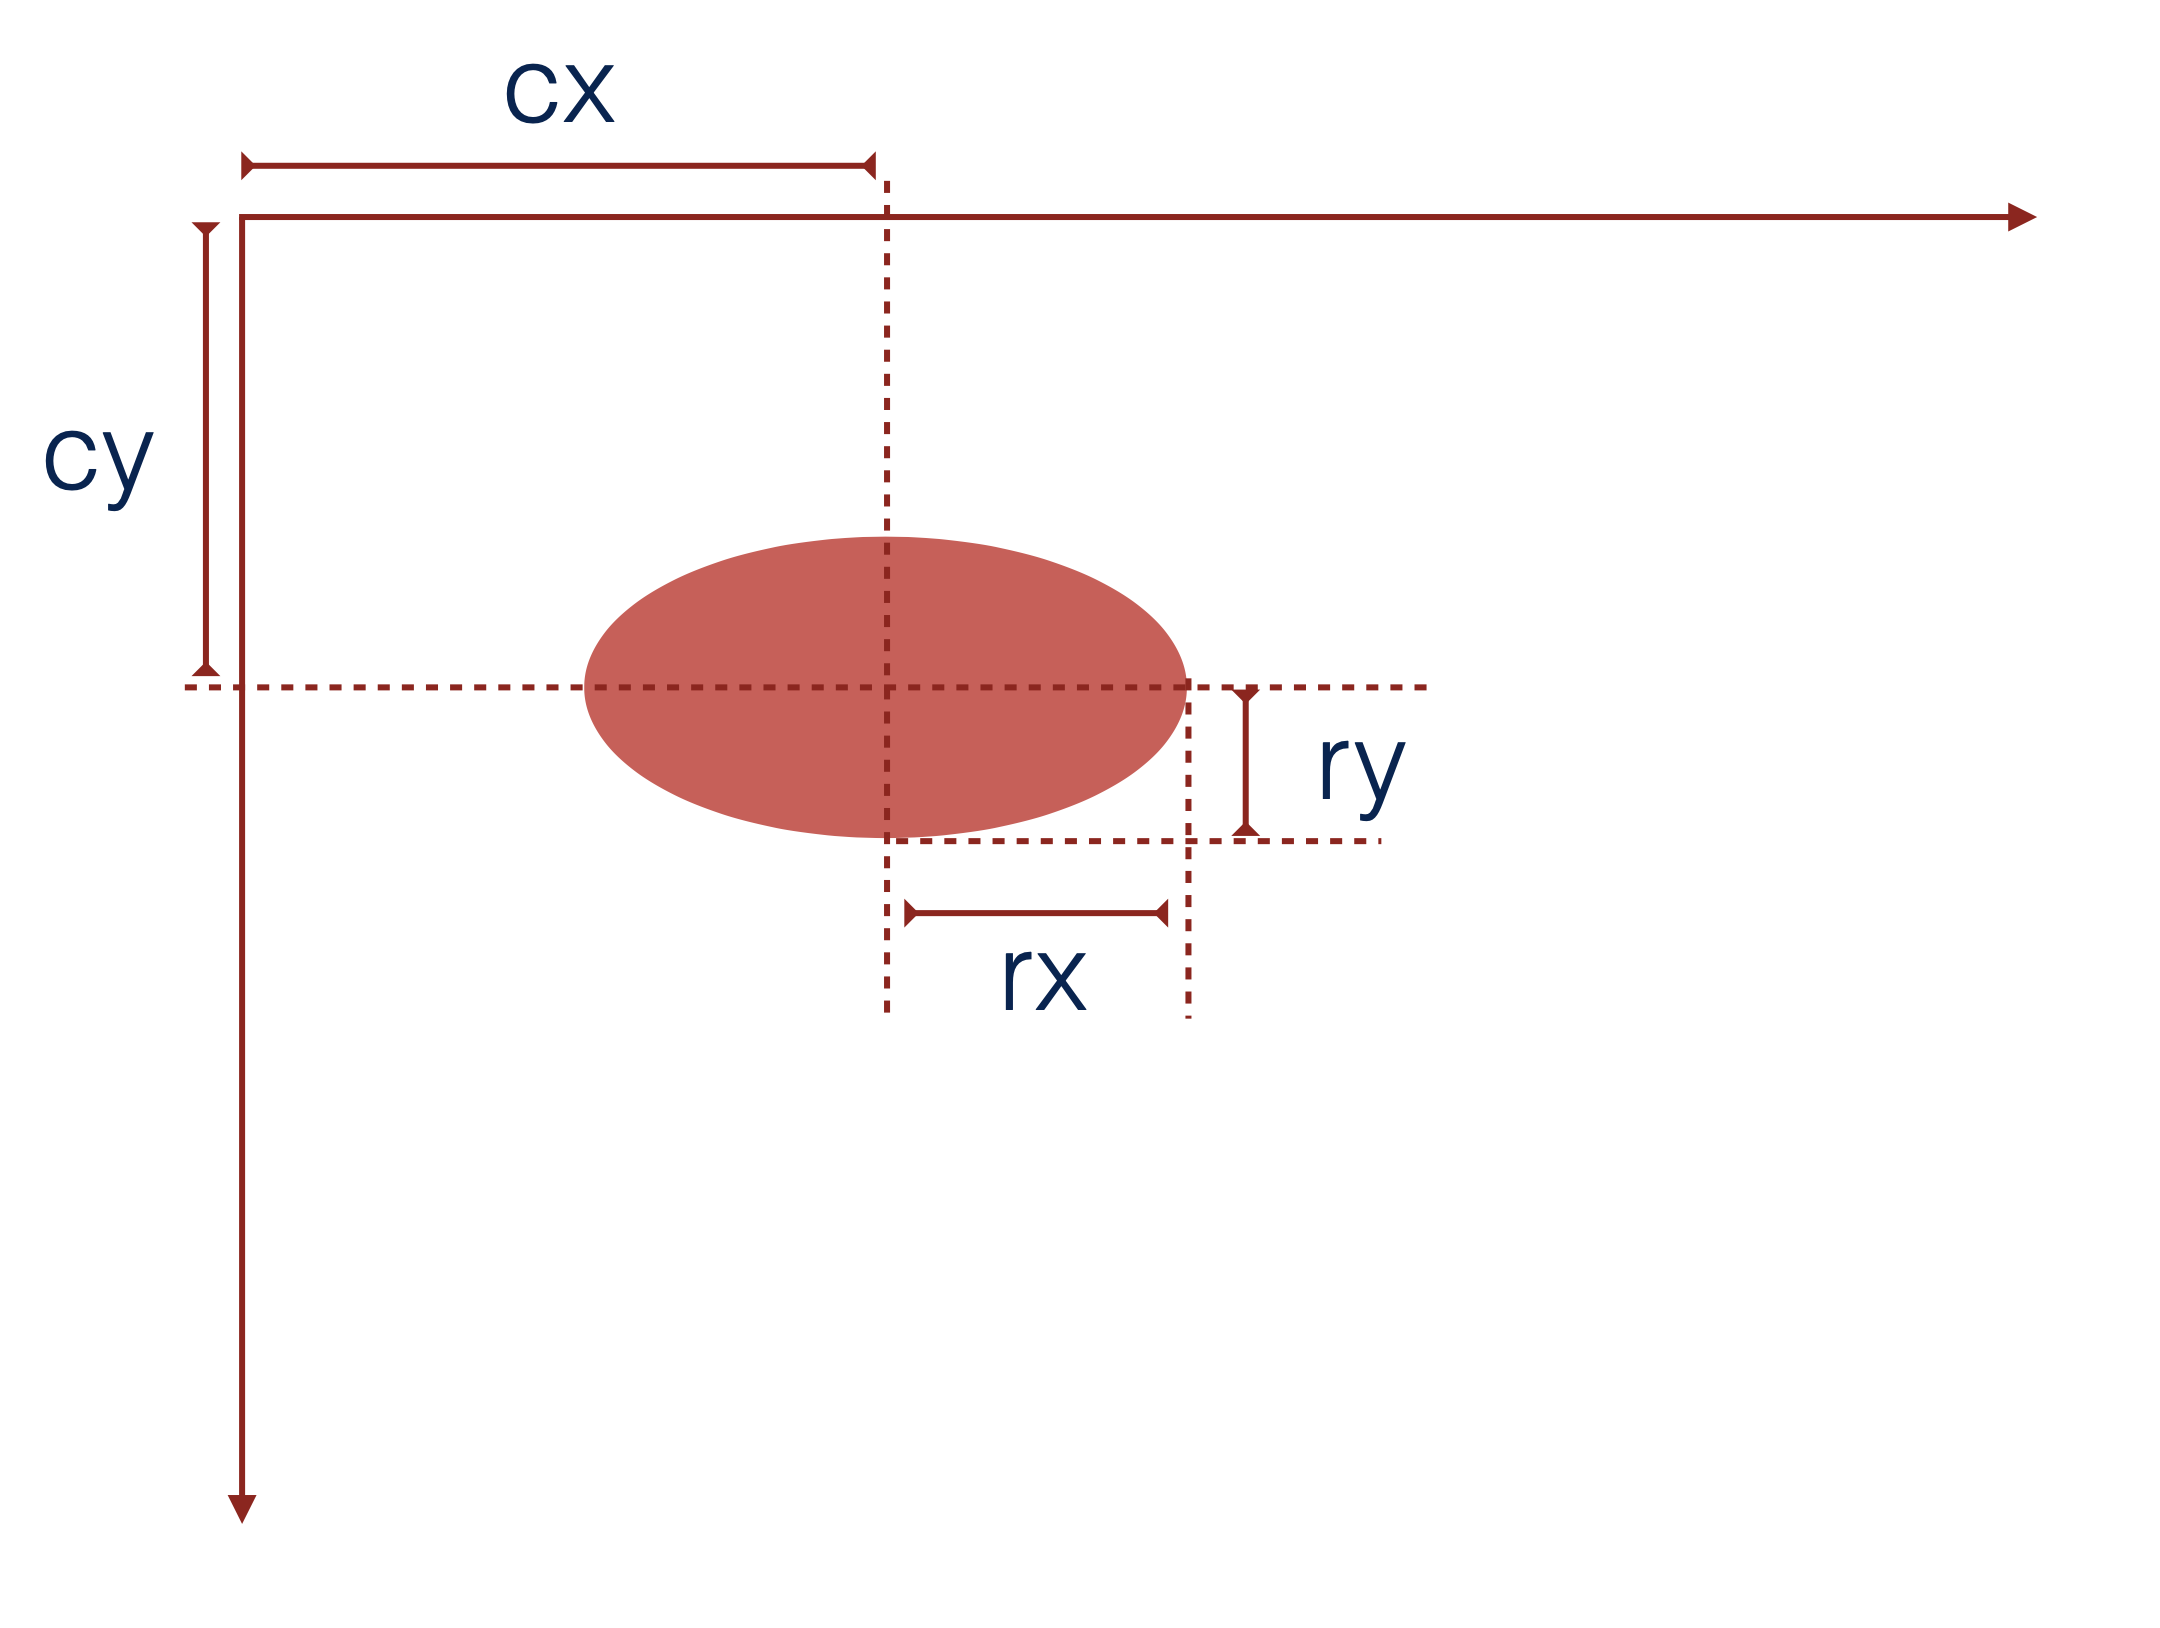
<ellipse cx="75" cy="75" rx="20" ry="5" />
2.1.4 线条 - <line>
x1- 起点的 x 位置y1- 起点的 y 位置x2- 终点的 x 位置y2- 终点的 y 位置
2.1 基本形状 线条
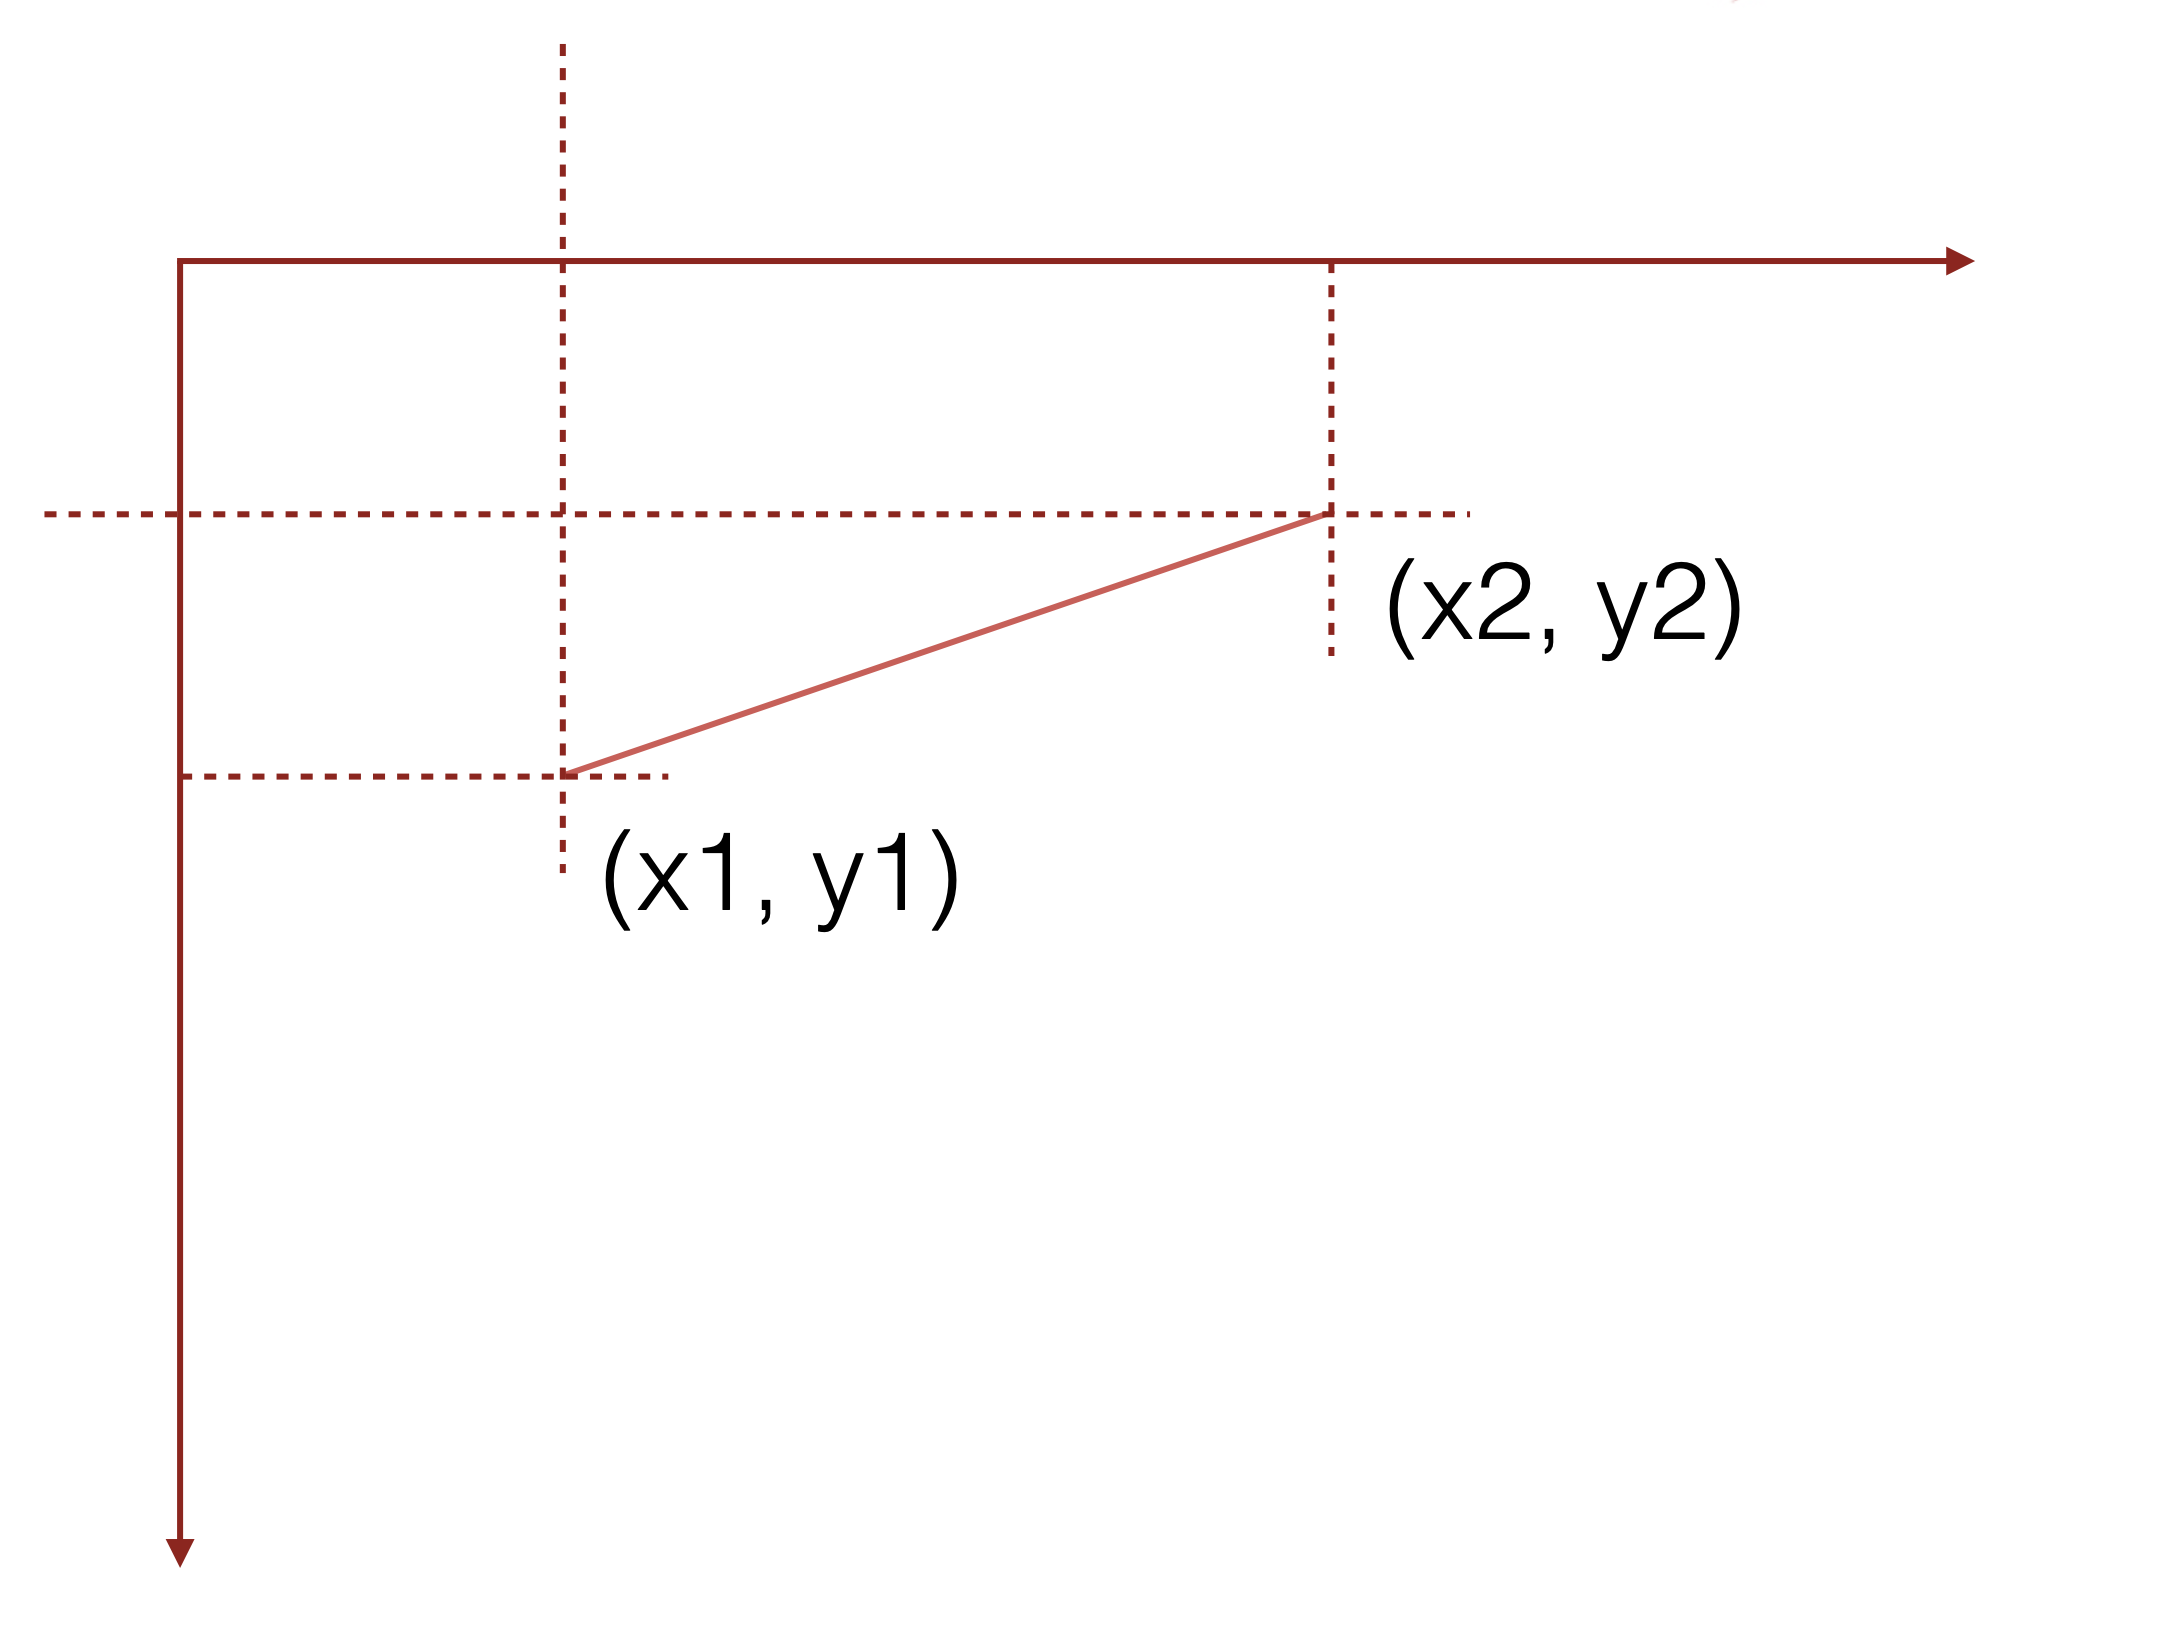
<line x1="10" x2="50" y1="110" y2="150" />
2.1.5 折线 - <polyline>
points- 点集数列。每个数字用空白、逗号、终止命令符或者换行符分隔开。每个点必须包含 2 个数字,一个是 x 坐标,一个是 y 坐标。所以点列表 (0,0), (1,1) 和 (2,2) 可以写成这样:“0 0, 1 1, 2 2”。
2.1 基本形状 折线
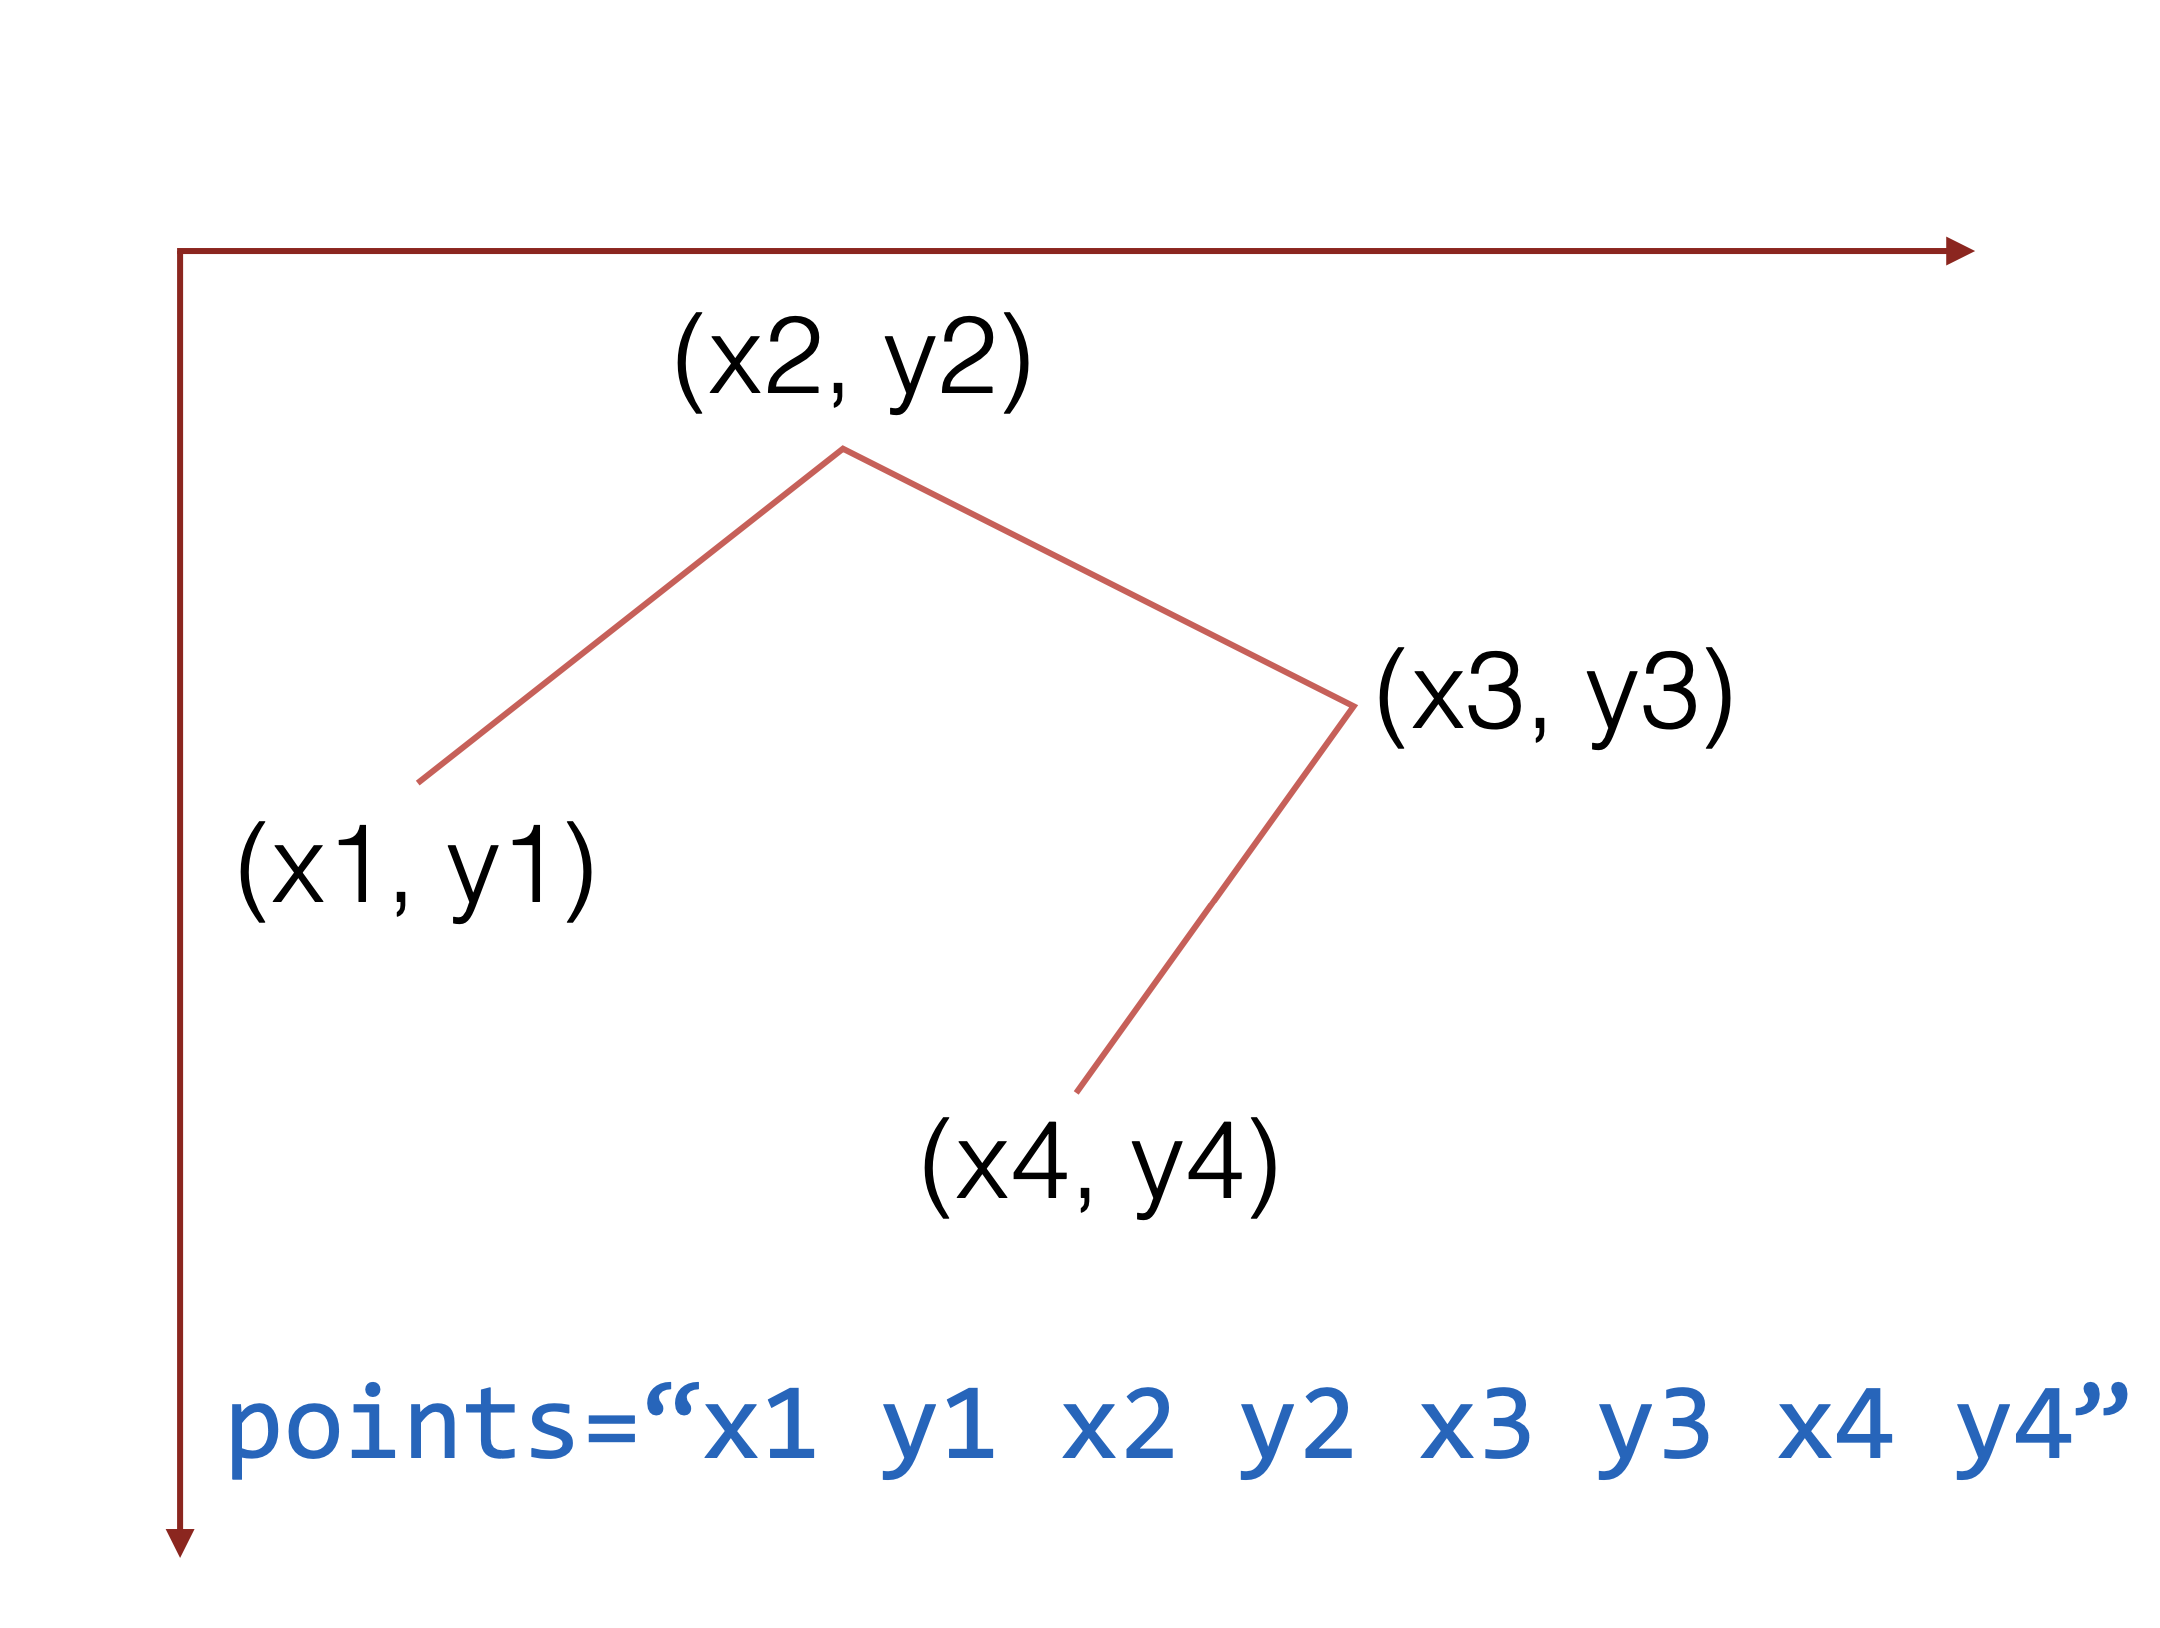
<polyline points="60 110, 65 120, 70 115, 75 130, 80 125, 85 140, 90 135, 95 150, 100 145" />
2.1.6 多边形 - <polygon>
points- 点集数列。每个数字用空白符、逗号、终止命令或者换行符分隔开。每个点必须包含 2 个数字,一个是 x 坐标,一个是 y 坐标。所以点列表 (0,0), (1,1) 和 (2,2) 可以写成这样:“0 0, 1 1, 2 2”。路径绘制完后闭合图形,所以最终的直线将从位置 (2,2) 连接到位置 (0,0)。
2.1 基本形状 多边形
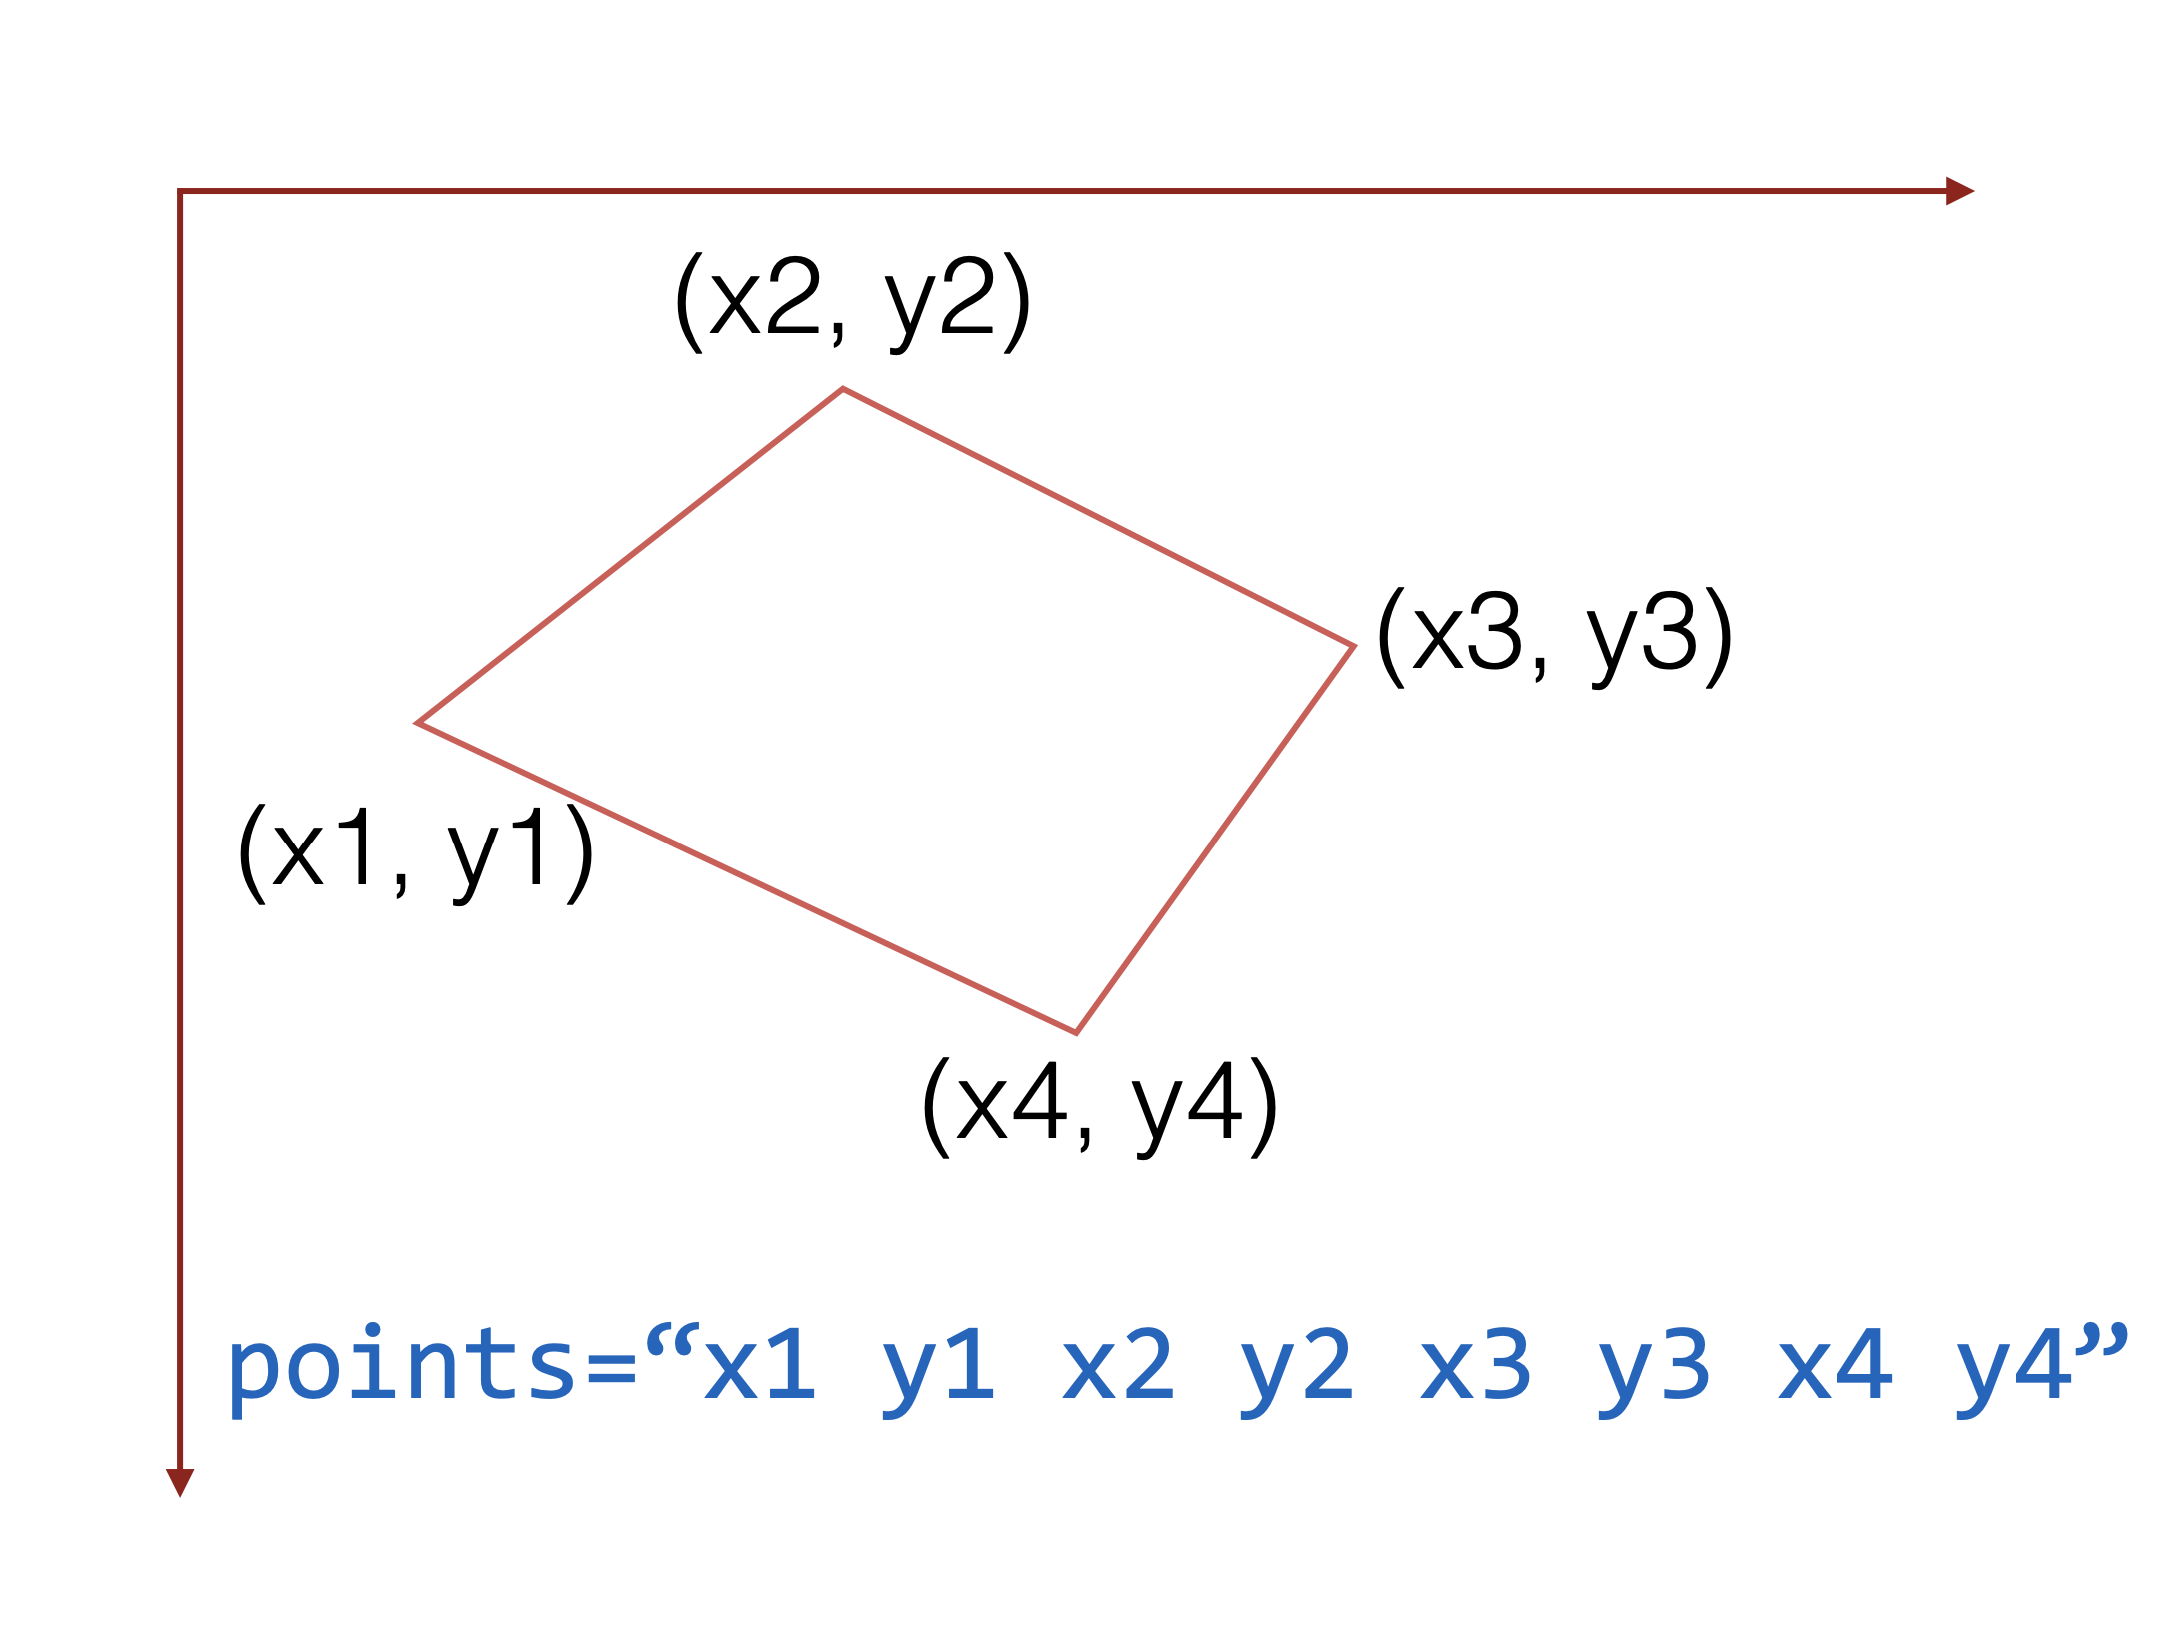
<polygon points="50 160, 55 180, 70 180, 60 190, 65 205, 50 195, 35 205, 40 190, 30 180, 45 180" />
2.1.7 路径 - <path>
d- 一个点集数列以及其它关于如何绘制路径的信息。
<path d="M 20 230 Q 40 205, 50 230 T 90230" />
<path> 非常强大,但导致 d 的使用非常多样,这是灵活的代价。
2.1 基本形状 路径
2.2 - d
以下元素可以使用 d 属性:
同样的规则可以应用到 <animate> 动画路径上。
属性 d 实际上是一个字符串,包含了一系列路径描述。这些路径由下面这些指令组成:
这些命令是大小写敏感的;
- 大写的命令指明它的参数是绝对位置
- 小写的命令指明相对于当前位置的点
可以指定一个负数值作为命令的参数:
- 负角度将是逆时针的
- 绝对 x 和 y 位置将视为负坐标
- 负相对 x 值将会往左移,而负相对 y 值将会向上移
2.2.1 Moveto
作用:
- 可以被想象成拎起绘图笔,落脚到另一处
- 在上一个点和这个指定点之间没有线段绘制
用一个 Moveto 命令开始一个路径是好的作法,因为如果没有一个初始化的 Moveto,执行命令时开始点会是上一个操作发生过的地方,这样可能造成不确定的行为。
语法:
M x,y- x 和 y 是绝对坐标,分别代表水平坐标和垂直坐标m dx,dy-dx和dy是相对于当前点的距离,分别是向右和向下的距离
<!-- 位于绝对位置x=50, y= 100: -->
<path d="M50,100..." />
<!-- 往右移50,往下移100: -->
<path d="m50,100..." />
2.2 d d - 画直线
2.2.2 Lineto
作用:
- 绘制一条直线段
- 直线段从当前位置移到指定位置
语法:
L x, y- x 和 y 是绝对坐标,分别代表水平坐标和垂直坐标l dx, dy-dx和dy是相对于当前点的距离,分别是向右和向下的距离H x或h l-x为纵坐标,l为长度,表示向 x 轴方向的延伸V y或v l-y为横坐标,l为长度,表示向 y 轴方向的延伸
2.2 d d - 画直线
2.2.3 Curveto
作用:
- 指定一个贝塞尔曲线。
有两种类型的贝塞尔曲线:立方曲线和二次方曲线。
- 二次方贝塞尔曲线是一种特殊的立方贝塞尔曲线,在这里,控制点的两端是相同的。
- 立方贝赛尔曲线遵守二次方贝赛尔曲线同样的概念,但是它需要考虑两个控制点。
语法:
- 二次方贝塞尔曲线:
Q cx, cy x, y或q dcx, dcy dx, dy-cx和cy都是控制点的绝对坐标,dcx和dcy分别是控制点在 x 和 y 方向上的距离 - 立方贝塞尔曲线:
C c1x,c1y c2x,c2y x,y或c dc1x,dc1y dc2x,dc2y dx,dy-c1x、c1y和c2x、c2y分别是初始点和结束点的控制点的绝对坐标。dc1x、dc1y和dc2x、dc2y都是相对于初始点,而不是相对于结束点的。dx和dy分别是向右和向下的距离
为了连缀平滑的贝塞尔曲线,还可以使用 T 和 S 命令。它们的语法比别的Curveto 命令简单,因为它假定第一个控制点是从前一个控制点关于前一个点的反射,或者说如果没有前一个控制点的话它实际上就是前一个点。
- 二次方贝塞尔曲线:
T-T x,y者t dx,dy- 对应于绝对坐标和相对距离 - 立方贝塞尔曲线:
S-S cx,cy x,y者s dcx,dcy dx,dy-(d)cx指定第二个控制点
2.2 d d - 画曲线
2.2.4 Arcto
作用:
- 绘制椭圆弧曲线路径
语法:
A rx,ry xAxisRotate LargeArcFlag,SweepFlag x,yrx和ry- x 和 y 方向的半径xAxisRotate- 改变 x 轴相对于当前引用框架的方向(在 Gecko 7 中,看起来没什么效果)LargeArcFlag(0 或 1) - 画小弧(0)或画大弧(1)SweepFlag(0 或 1) - 弧是顺时针方向(1)还是逆时针方向(0)x和y- 目的地的坐标
2.2 d d - 画弧线
2.2.5 ClosePath
作用:
- 在当前路径从当前点到第一个点简单画一条直线。
它是最简单的命令,而且不带有任何参数。它沿着到开始点的最短的线性路径,如果别的路径落在这路上,将可能路径相交。
语法:
Zz- 两种写法作用都一样(无参数)
2.2.6 综合d
d=" M37,17 || v15 || H14 || V17 || H37 ||z // M50,0 || H0 || v50 || h50 || V0 || z"
d=- 这个属性包含了构成整个SVG的字符串M37,17-M是 MoveTo 的缩写。大写的M意味着绝对坐标,小写的m意味着相对距离。它暗含着是基于开始坐标,线在框里面,而且你在方框内矩形的右上角开始37- 是开始 svg 位置的缩写,在 x 轴坐标 37 像素处17- 开始 svg 位置,在 y 轴的 17 像素处v15-v代表垂直。大写的V意味着绝对坐标,小写的v表示相对的长度、距离。dx/dy和x/y可以用在H/V和h/v相应的位置,这里是表示相对于给定坐标画一条 15 像素的垂直线。它意味着你向下画 15 像素,到坐标 37,32H14-H代表水平,它是绝对坐标,因为它是大写的,从v15的终点开始,画一条水平线直到到达绝对坐标 14,当到达 x 坐标 14 时结束画线。笔触位于坐标 14,32V17- 就像前面那样,从上一条线的终点开始,画一条垂直线,直到到达y 轴坐标 17。笔触位于坐标 14,17H37- 最后,从 14,17 开始,画一条水平线,直到到达x轴坐标 37。笔触位于坐标 37,17(M的值)z- 小写的z和大写的Z都是闭合一系列svg线段,- 逗号开始下一串简单矢量图形线段。下一系列简单矢量线段将制作外层方框M50,0- 在 x 轴 50 和 y 轴 0 处开始H0- 画一条直线直到 0,0v50- 相对于 0,0 画一条 50 像素的垂直线。这条线将画到 0,50h50- 相对于 0,-50 画一条 50 像素的水平线。这条线将向右画到 50,50V0- 画一条垂直线直到到达 y 轴坐标 0。这将画线到 50,0 ,即M的值z- 小写的z和大写的Z都是闭合一系列 svg 线段
2.2 d d - 属性的综合示例
2.3 基本属性
- 可以使用在 HTML 中的 CSS颜色 命名方案定义
fill和stroke的颜色,比如说颜色名(red)、rgb值(rgb(255,0,0))、十六进制值、rgba值,等等- 出于兼容性考虑,不要使用 rgba 颜色,透明度可通过
fill-opacity和stroke-opacity设置,不要混用 rgba 颜色 和*-opacity,会有意想不到的结果,造成混乱
2.3.1 填充
fill- 设置对象内部的颜色(填充色)fill-opacity- 设置对象内部的颜色(填充色)的透明度
2.3.2 描边
描边是以路径为中心线绘制的,路径的每一侧都有均匀分布的描边
stroke- 设置绘制对象描边(边框)的颜色stroke-opacity- 设置对象描边(边框)的颜色的透明度stroke-width- 设置对象描边(边框)的宽度stroke-linecap- 设置描边(边框)终点的形状butt用直边结束线段,它是常规做法,线段边界 90 度垂直于描边的方向、贯穿它的终点square的效果差不多,但是会稍微超出实际路径的范围,超出的大小由stroke-width控制round表示边框的终点是圆角,圆角的半径也由stroke-width控制
<?xml version="1.0" standalone="no"?>
<svg width="160" height="140" xmlns="http://www.w3.org/2000/svg" version="1.1">
  <line x1="40" x2="120" y1="20" y2="20" stroke="#333" stroke-width="20" stroke-linecap="butt"/>
  <text x="40" y="45">stroke-linecap="butt"</text>

  <line x1="40" x2="120" y1="60" y2="60" stroke="#333" stroke-width="20" stroke-linecap="square"/>
  <text x="40" y="85">stroke-linecap="square"</text>

  <line x1="40" x2="120" y1="100" y2="100" stroke="#333" stroke-width="20" stroke-linecap="round"/>
  <text x="40" y="125">stroke-linecap="round"</text>
</svg>
<?xml version=”1.0” standalone=”no”?>
stroke-linejoin- 设置两条描边(边框)线段之间,用什么方式连接miter默认值,表示用方形画笔在连接处形成尖角round用圆角连接,实现平滑效果bevel连接处会形成一个斜接
<?xml version=”1.0” standalone=”no”?>
stroke-dasharray将虚线类型应用在描边上,该属性的参数,是一组用逗号分割的数字组成的数列。注意,和path不一样,这里的数字必须用逗号分割(空格会被忽略)。每一组数字,第一个用来表示填色区域的长度,第二个用来表示非填色区域的长度。
<?xml version="1.0" standalone="no"?>
<svg width="200" height="150" xmlns="http://www.w3.org/2000/svg" version="1.1">
  <path d="M 10 75 Q 50 10 100 75 T 190 75" stroke="#333"
    stroke-linecap="round" stroke-dasharray="5,10,5" fill="none"/>

  <path d="M 10 75 L 190 75" stroke="red"
    stroke-linecap="round" stroke-width="1" stroke-dasharray="5,5" fill="none"/>
</svg>
<?xml version=”1.0” standalone=”no”?>
在上面的例子里,第二个路径会先做5个像素单位的填色,紧接着是5个空白单位,然后又是5个单位的填色。如果你想要更复杂的虚线模式,你可以定义更多的数字。第一个例子指定了3个数字,这种情况下,数字会循环两次,形成一个偶数的虚线模式(奇数个循环两次变偶数个)。所以该路径首先渲染5个填色单位,10个空白单位,5个填色单位,然后回头以这3个数字做一次循环,但是这次是创建5个空白单位,10个填色单位,5个空白单位。通过这两次循环得到偶数模式,并将这个偶数模式不断重复。
fill-rule定义如何给图形重叠的区域上色stroke-miterlimit定义什么情况下绘制或不绘制边框连接的miter效果stroke-dashoffset定义虚线开始的位置
2.3.3 使用 CSS
所有的SVG元素的初始display值都是inline。
除了定义对象的属性外,也可以通过 CSS 来样式化填充和描边。语法和在 html 里使用 CSS 一样,只不过你要把 background-color、border 改成 fill 和 stroke。注意,不是所有的属性都能用 CSS 来设置。上色和填充的部分一般是可以用 CSS 来设置的,比如 fill,stroke,stroke-dasharray 等,但是不包括渐变和图案等功能。另外,width、height,以及路径的命令等等,都不能用 CSS 设置
SVG规范 将属性区分成 properties 和其他 attributes ,前者是可以用 CSS 设置的,后者不能。
- 使用
style属性 将 CSS 插入到元素的行间
<rect x="10" height="180" y="10" width="180" style="stroke: black; fill: red;"/>
- 使用
<style>设置一段样式段落
<?xml version="1.0" standalone="no"?>
<svg width="200" height="200" xmlns="http://www.w3.org/2000/svg" version="1.1">
  <defs>
    <style type="text/css"><![CDATA[
       #MyRect {
         stroke: black;
         fill: red;
       }
    ]]></style>
  </defs>
  <rect x="10" height="180" y="10" width="180" id="MyRect"/>
</svg>
<?xml version=”1.0” standalone=”no”?>
- 在 SVG 里
<style>放在<defs>标签里。<defs>表示定义,这里面可以定义一些不会在 SVG 图形中出现、但是可以被其他元素使用的元素- 一些可以在 html 里使用的 CSS,在 SVG 里可能无法正常工作,比如
before和after伪类,但可以使用hover
- 定义一个外部的样式表,但是要符合 normal XML-stylesheet syntax 的 CSS规则
<?xml version="1.0" standalone="no"?>
<?xml-stylesheet type="text/css" href="style.css"?>

<svg width="200" height="150" xmlns="http://www.w3.org/2000/svg" version="1.1">
  <rect height="10" width="10" id="MyRect"/>
</svg>
2.4 渐变
2.4.1 线性渐变
<linearGradient>线性渐变 - 沿着直线改变颜色,插入一个线性渐变,需要在 SVG 文件的<defs>元素内部,创建一个<linearGradient>节点x1、y1\x2、y2- 渐变的起始点和结束点,渐变会沿着起始点和结束点的连线方向xlink:href- 可通过 id 引用其它的渐变<stop>结点offset(偏移) - 渐变的特定位置( 0-1 或 0%-100% )stop-color(颜色中值) - 特定位置的颜色stop-opacity- 特定位置的半透明度
x1、y1 \ x2、y2
<linearGradient id="Gradient2" x1="0" x2="0" y1="0" y2="1">
xlink:href
 <linearGradient id="Gradient1">
   <stop id="stop1" offset="0%"/>
   <stop id="stop2" offset="50%"/>
   <stop id="stop3" offset="100%"/>
 </linearGradient>
 <linearGradient id="Gradient2" x1="0" x2="0" y1="0" y2="1"
    xmlns:xlink="http://www.w3.org/1999/xlink" xlink:href="#Gradient1"/>
<stop>
<stop offset="100%" stop-color="yellow" stop-opacity="0.5"/>
线性渐变内部有几个 <stop> 结点,这些结点通过指定位置的 offset(偏移)属性和 stop-color(颜色中值)属性来说明在渐变的特定位置上应该是什么颜色
<svg width="120" height="240" version="1.1" xmlns="http://www.w3.org/2000/svg">
  <defs>
      <!-- 通过 style 设置渐变 -->
      <linearGradient id="Gradient1">
        <stop class="stop1" offset="0%"/>
        <stop class="stop2" offset="50%"/>
        <stop class="stop3" offset="100%"/>
      </linearGradient>
      <!-- 直接设置渐变属性 -->
      <linearGradient id="Gradient2" x1="0" x2="0" y1="0" y2="1">
        <stop offset="0%" stop-color="red"/>
        <stop offset="50%" stop-color="black" stop-opacity="0"/>
        <stop offset="100%" stop-color="blue"/>
      </linearGradient>
      <!-- style -->
      <!-- 通过 Id 关联 -->
      <style type="text/css"><![CDATA[
       #rect1 { fill: url(#Gradient1); }
        .stop1 { stop-color: red; }
        .stop2 { stop-color: black; stop-opacity: 0; }
        .stop3 { stop-color: blue; }
      ]]></style>
  </defs>

 <!-- 通过 style 设置渐变 -->
  <rect id="rect1" x="10" y="10" rx="15" ry="15" width="100" height="100"/>
  <!-- 直接设置渐变属性 -->
  <rect x="10" y="120" rx="15" ry="15" width="100" height="100" fill="url(#Gradient2)"/>

</svg>
2.4 渐变 渐变 - 线性渐变
2.4.2 径向渐变
<radialGradient>从一个点开始发散绘制渐变。创建径向渐变需要在 SVG 文件的<defs>的内部添加一个<radialGradient>元素cx(圆心 x)、cy(圆心 y)、r(半径) - 渐变的圆形范围fx、fy- 渐变的中心(焦点),渐变会在园内,从渐变中心延半径向四周发散。如果焦点在圆外则无法显示渐变;如果没有设置焦点则默认为圆心
<?xml version=”1.0” standalone=”no”?>
<?xml version="1.0" standalone="no"?>
<svg width="120" height="240" version="1.1" xmlns="http://www.w3.org/2000/svg">
  <defs>
      <radialGradient id="RadialGradient1">
        <stop offset="0%" stop-color="red"/>
        <stop offset="100%" stop-color="blue"/>
      </radialGradient>
      <radialGradient id="RadialGradient2" cx="0.25" cy="0.25" r="0.25">
        <stop offset="0%" stop-color="red"/>
        <stop offset="100%" stop-color="blue"/>
      </radialGradient>
  </defs>

  <rect x="10" y="10" rx="15" ry="15" width="100" height="100" fill="url(#RadialGradient1)"/>
  <rect x="10" y="120" rx="15" ry="15" width="100" height="100" fill="url(#RadialGradient2)"/>

</svg>
<?xml version=”1.0” standalone=”no”?>
2.4 渐变 渐变 - 径向渐变
2.4.3 通用属性
线性渐变和径向渐变都需要一些额外的属性用于描述渐变过程
spreadMethod- 控制当渐变到达终点的行为,但是此时该对象尚未被填充颜色。pad- 默认值,当渐变到达终点时,最终的偏移颜色被用于填充对象剩下的空间reflect- 会让渐变持续,它的效果是与渐变本身是相反的,以 100% 偏移位置的颜色开始,逐渐偏移到 0% 位置的颜色,然后再回到 100% 偏移位置的颜色repeat- 会让渐变继续,跳回到最初的颜色然后继续渐变
<?xml version=”1.0” standalone=”no”?>
gradientUnits(渐变单元) - 用来描述渐变的大小和方向的单元系统objectBoundingBox(默认值,范围 0-1)它大体上定义了对象的渐变大小范围,渐变就会自动的缩放到对象相同大小userSpaceOnUse使用绝对单元,所以你必须知道对象的位置,并将渐变放在同样地位置上
gradientTransform给渐变添加额外的变化,参考 Transformations
2.4 渐变 渐变 - 径向渐变
2.5 笔刷
跟渐变一样,[
<?xml version="1.0" standalone="no"?>
<svg width="200" height="200" xmlns="http://www.w3.org/2000/svg" version="1.1">
  <defs>
    <linearGradient id="Gradient1">
      <stop offset="5%" stop-color="white"/>
      <stop offset="95%" stop-color="blue"/>
    </linearGradient>
    <linearGradient id="Gradient2" x1="0" x2="0" y1="0" y2="1">
      <stop offset="5%" stop-color="red"/>
      <stop offset="95%" stop-color="orange"/>
    </linearGradient>
    <pattern id="Pattern" x="0" y="0" width=".25" height=".25">
      <rect x="0" y="0" width="50" height="50" fill="skyblue"/>
      <rect x="0" y="0" width="25" height="25" fill="url(#Gradient2)"/>
      <circle cx="25" cy="25" r="20" fill="url(#Gradient1)" fill-opacity="0.5"/>
    </pattern>

  </defs>

  <rect fill="url(#Pattern)" stroke="black" x="0" y="0" width="200" height="200"/>
</svg>
-
patternUnits- 描述使用的属性单元。这同之前使用的objectBoundingBox默认值一样,所以当一个值为 1 时,它被缩放到应用 pattern 对象的宽高值。因此,我们希望 pattern 垂直和水平的重复 4 次,所以宽高被设置位 0.25,这一位置 pattern 的宽高仅为总外框大小的 0.25。 -
patternContentUnits- 描述 pattern 元素基于基本形状使用的单元系统userSpaceOnUse(默认值),与patternUnits属性相反,这意味着除非你至少指定其中一个属性值(patternContentUnits或patternUnits),否则在 pattern 中绘制的形状将与 pattern 元素使用的坐标系不同,
如果对象改变了大小,pattern 会自适应其大小,但是对象里面的内容不会自适应。通过改变
patternContentUnits属性,我们可以把所有的元素放到相同的单元系统中,
参考:<pattern>
2.6 文字
2.6.1 <text />
x- 文本在视口中 x 轴的位置y- 文本在视口中 y 轴的位置dx- 从当前位置,用一个水平偏移开始绘制文本。可以提供一个数列,可以应用到连续的字体,因此每次累积一个偏移。dy- 从当前位置,用一个竖直偏移开始绘制文本。可以提供一个数列,可以应用到连续的字体,因此每次累积一个偏移。text-anchorstart、middle、end或inherit- 允许决定从这一点开始的文本流的方向。
fill- 设置文本填充颜色stroke- 设置文本描边
形状元素和文本元素都可以引用渐变或图案
设置字体属性 - 下列每个属性可以被设置为一个SVG属性或者成为一个 CSS 声明:
font-family、font-style、font-weight、font-variant、font-stretch、font-size、font-size-adjust、kerning、letter-spacing、word-spacing和text-decoration。
<text x="10" y="10">Hello World!</text>
2.6.2 <tspan />
该元素用来标记大块文本的子部分,它必须是一个 text 元素或别的 tspan 元素的子元素。一个典型的用法是把句子中的一个词变成粗体红色。
x- 为容器设置一个新绝对 x 坐标。它覆盖了默认的当前的文本位置。可以提供一个数列,它们将一个一个地应用到tspan元素内的每一个字符上。dx- 从当前位置,用一个水平偏移开始绘制文本。可以提供一个数列,可以应用到连续的字体,因此每次累积一个偏移。
此外还有属性 y 和属性 dy 作垂直转换。
rotate- 把所有的字符旋转一个角度。如果是一个数列,则使每个字符旋转分别旋转到那个值,剩下的字符根据最后一个值旋转。textLength- 给出字符串的计算长度。它意味着如果它自己的度量文字和长度不满足这个提供的值,则允许渲染引擎精细调整字型的位置。
<text>
  <tspan font-weight="bold" fill="red">This is bold and red</tspan>
</text>
2.6.3 <tref />
该元素允许引用已经定义的文本,高效地把它复制到当前位置。可以独立于源样式化它、修改它的外观。
xlink:href- 指向一个元素,取得其文本内容
<text id="example">This is an example text.</text>

<text>
    <tref xlink:href="#example" />
</text>
2.6.4 <textPath />
xlink:href- 取得一个任意路径,把字符对齐到路径,字体会环绕路径、顺着路径走
<path id="my_path" d="M 20,20 C 40,40 80,40 100,20" fill="transparent" />
<text>
  <textPath xmlns:xlink="http://www.w3.org/1999/xlink" xlink:href="#my_path">
    This text follows a curve.
  </textPath>
</text>
2.7 剪切和遮罩
擦除已经创建的元素的部分内容
Clipping 用来移除在别处定义的元素的部分内容。任何半透明效果都是不行的。它只能要么显示要么不显示。
Masking 允许使用透明度和灰度值遮罩计算得的软边缘。遮罩的效果最令人印象深刻的是表现为一个渐变。如果你想要让一个元素淡出,你可以利用遮罩效果实现。
2.7.1 剪切
<svg version="1.1" xmlns="http://www.w3.org/2000/svg" xmlns:xlink="http://www.w3.org/1999/xlink">
  <defs>
    <clipPath id="cut-off-bottom">
      <rect x="0" y="0" width="200" height="100" />
    </clipPath>
  </defs>

  <circle cx="100" cy="100" r="100" clip-path="url(#cut-off-bottom)" />
</svg>
在 (100,100) 创建一个圆形,半径是 100。属性 clip-path 引用了一个带单个 rect 元素的 <clipPath> 元素。它内部的这个矩形将把画布的上半部分涂黑。
注意,
clipPath元素经常放在一个defs元素内。
该rect不会被绘制。它的象素数据将用来确定:圆形的哪些像素需要最终呈现出来。因为矩形只覆盖了圆形的上半部分,所以下半部分将消失了。
2.7.2 遮罩
<svg version="1.1" xmlns="http://www.w3.org/2000/svg" xmlns:xlink="http://www.w3.org/1999/xlink">
  <defs>
    <linearGradient id="Gradient">
      <stop offset="0" stop-color="white" stop-opacity="0" />
      <stop offset="1" stop-color="white" stop-opacity="1" />
    </linearGradient>
    <mask id="Mask">
      <rect x="0" y="0" width="200" height="200" fill="url(#Gradient)"  />
    </mask>
  </defs>

  <rect x="0" y="0" width="200" height="200" fill="green" />
  <rect x="0" y="0" width="200" height="200" fill="red" mask="url(#Mask)" />
</svg>
注意的是描边将绘制在填充的上面。因此,如果你在一个元素上设置了描边透明度,但它同时设有填充,则描边的一半应用填充色,另一半将应用背景色。
<svg  width="200" height="200" version="1.1" xmlns="http://www.w3.org/2000/svg" xmlns:xlink="http://www.w3.org/1999/xlink" >
  <rect x="0" y="0" width="200" height="200" fill="blue" />
  <circle cx="100" cy="100" r="50" stroke="yellow" stroke-width="40" stroke-opacity=".5" fill="red" />
</svg>
红色的圆形在蓝色的背景上,黄色描边设置为50%不透明度,导到双色描边的效果。
2.8 嵌入内容
2.8.1 嵌入光栅图像
SVG 有一个 image 元素,与 HTML 中的 img 元素同样的目的。可以利用它嵌入任意光栅(以及矢量)图像。它的规格要求应用至少支持 PNG、JPG 和 SVG 格式文件。嵌入的图像变成一个普通的 SVG 元素。可以在其内容上用剪切、遮罩、滤镜、旋转以及其它 SVG 工具。
<svg version="1.1"
     xmlns="http://www.w3.org/2000/svg" xmlns:xlink="http://www.w3.org/1999/xlink"
     width="200" height="200">
  <image x="90" y="-65" width="128" height="146" transform="rotate(45)"
     xlink:href="..."/>
</svg>
- 如果没有设置 x 属性或 y 属性,它们自动被设置为 0。
- 如果没有设置 height 属性或 width 属性,它们自动被设置为 0。
- 如果 width 属性或 height 等于 0,将不会呈现这个图像。
2.8.2 嵌入任意 XML
SVG 是一个 XML 应用,所以总是可以在 SVG 文档的任何位置嵌入任意 XML。
<foreignObject> 用来在 SVG 中嵌入 XHTML。如果你有更长的文本,HTML 布局比 SVG text 元素更适合。另一个经常被引用的用例是用 MathML 写的方程式。对于 SVG 的在科学方面的应用。
因为 foreignObject 是一个 SVG 元素,所以可以像用图像那样,在其内容上使用各种 SVG 工具。
2.9 滤镜效果
滤镜(Filter)是 SVG 中用于创建复杂效果的一种机制。
滤镜通过 <filter> 元素进行定义,并且置于 <defs> 区块中。在 filter 标签中提供一系列图元(primitives),以及在前一个基本变换操作上建立的另一个操作(比如添加模糊后又添加明亮效果)。如果要应用所创建的滤镜效果,只需要为 SVG 图形元素设置 filter 属性即可。
<svg width="250" viewBox="0 0 200 85"
     xmlns="http://www.w3.org/2000/svg" version="1.1">
  <defs>
    <!-- Filter declaration -->
    <filter id="MyFilter" filterUnits="userSpaceOnUse"
            x="0" y="0"
            width="200" height="120">

      <!-- offsetBlur -->
      <feGaussianBlur in="SourceAlpha" stdDeviation="4" result="blur"/>
      <feOffset in="blur" dx="4" dy="4" result="offsetBlur"/>

      <!-- litPaint -->
      <feSpecularLighting in="blur" surfaceScale="5" specularConstant=".75"
                          specularExponent="20" lighting-color="#bbbbbb"
                          result="specOut">
        <fePointLight x="-5000" y="-10000" z="20000"/>
      </feSpecularLighting>
      <feComposite in="specOut" in2="SourceAlpha" operator="in" result="specOut"/>
      <feComposite in="SourceGraphic" in2="specOut" operator="arithmetic"
                   k1="0" k2="1" k3="1" k4="0" result="litPaint"/>

      <!-- merge offsetBlur + litPaint -->
      <feMerge>
        <feMergeNode in="offsetBlur"/>
        <feMergeNode in="litPaint"/>
      </feMerge>
    </filter>
  </defs>

  <!-- Graphic elements -->
  <g filter="url(#MyFilter)">
      <path fill="none" stroke="#D90000" stroke-width="10"
            d="M50,66 c-50,0 -50,-60 0,-60 h100 c50,0 50,60 0,60z" />
      <path fill="#D90000"
            d="M60,56 c-30,0 -30,-40 0,-40 h80 c30,0 30,40 0,40z" />
      <g fill="#FFFFFF" stroke="black" font-size="45" font-family="Verdana" >
        <text x="52" y="52">SVG</text>
      </g>
  </g>
</svg>
步骤一
<feGaussianBlur
  in="SourceAlpha"
  stdDeviation="4"
  result="blur"/>
设置 <feGaussianBlur> 中的 in 属性为 "SourceAlpha" 值,即原图像的 alpha 通道,并设置了模糊度为 4 以及把 result 保存在了一个名为 "blur" 的临时缓冲区中。
步骤二
<feOffset
  in="blur"
  dx="4" dy="4"
  result="offsetBlur"/>
<feOffset> 设置 in 的值为 "blur",即我们前面保存 result 的那个临时缓冲区。然后设置相对坐标,向右偏移 4,向下偏移 4。最后把结果 result 保存到名为 "offsetBlur" 的缓冲区中。步骤1、2其实是创建图形阴影的两个图元。
步骤三
<feSpecularLighting
  in="offsetBlur"
  surfaceScale="5"
  specularConstant=".75"
  specularExponent="20"
  lighting-color="#bbbbbb"
  result="specOut">
  <fePointLight x="-5000" y="-10000" z="20000"/>
</feSpecularLighting>
<feSpecularLighting> 设置输入源 in 为 "offsetBlur",将会生成一个光照效果,并将结果 result 保存在 "specOut" 中。
步骤四
<feComposite
  in="specOut"
  in2="SourceAlpha"
  operator="in"
  result="specOut"/>
第一个 <feComposite> 元素设置输入源为 "specOut",第二个输入源(in2)为 "SourceAlpha",将 "specOut" 的结果效果遮盖掉,以致于最后的结果不会大于 "SourceAlpha"(源图像),最后覆盖输出结果 result 为 "specOut"。
步骤五
<feComposite
  in="SourceGraphic"
  in2="specOut"
  operator="arithmetic"
  k1="0" k2="1" k3="1" k4="0"
  result="litPaint"/>
第二个 <feComposite> 设置 in 为 "SourceGraphic" 和 "specOut",即在 "SourceGraphic" 之上添加 "specOut" 的效果,复合模式为 "arithmetic",然后保存结果为 "litPaint"。
步骤六
<feMerge>
  <feMergeNode in="offsetBlur"/>
  <feMergeNode in="litPaint"/>
</feMerge>
最后,<feMerge> 元素合并了阴影效果 "offsetBlur" 和源图像的光照效果 "litPaint"。
2.10 SVG 字体
SVG 字体当前只在 Safari 和 Android 浏览器中受支持。
2.10.1 定义字体
定义一个SVG字体的基础是 <font> 元素。
<font id="Font1" horiz-adv-x="1000">
  <font-face font-family="Super Sans" font-weight="bold" font-style="normal"
      units-per-em="1000" cap-height="600" x-height="400"
      ascent="700" descent="300"
      alphabetic="0" mathematical="350" ideographic="400" hanging="500">
    <font-face-src>
      <font-face-name name="Super Sans Bold"/>
    </font-face-src>
  </font-face>
  <missing-glyph><path d="M0,0h200v200h-200z"/></missing-glyph>
  <glyph unicode="!" horiz-adv-x="300"><!-- Outline of exclam. pt. glyph --></glyph>
  <glyph unicode="@"><!-- Outline of @ glyph --></glyph>
  <!-- more glyphs -->
</font>
<font>元素- id - 使它能够通过一个 URI 被引用。
horiz-adv-x- 定义相比之单一字形的路径定义,一个字符的平均宽度。值1000是一个起作用的合理值。有一些陪同的属性,帮助进一步定义基本的字形盒布局。
<font-face>- 等同于 CSS 的@font-face声明。定义了最终字体的基本属性(如weight、style,等等)。font-family- 后面的 CSS 和 SVGfont-family属性可以引用它的值。font-weight和font-style- 与 CSS 中的描述符有同样的目的。- 后面所有的属性都是字体布局引擎的呈现指令。
<font-face-src>- 相对于 CSS 的@font-face描述符中的src描述符。可以利用它的子元素<font-face-name>和<font-face-uri>把字体声明指向外源。<missing-glyph>- 定义如果一个特定的字形在字体中找不到,而且也没有回调机制的话,该如何显示。它同时还显示了如何创建字形:在里面简单添加任一个图形化 SVG 内容。可以在这里使用任何其它的 SVG 元素,甚至是<filter>元素、<a>元素或者<script>元素。然而,为了简化字形,你可以简单添加一个属性d——它精确定义了字形的形状,就像标准 SVG 路径所做的那样。<glyph>- 真正的字形定义。unicode- 表达这个字形的 unicode 代码点。lang- 更进一步专门限定它为特定的语言(由目标上的xml:lang属性表达)。可以使用任意的 SVG 来定义这个字形,它允许用户代理所支持的很多效果。
<hkern>元素和<vkern>元素。这两个元素每个引用到至少两个字符(属性u1和属性u2)以及一个属性k决定了那些字符之间的距离应该减少多少。
<!-- 指示用户代理把“A”和“V”字符放得比标准的字符间距更靠近一些 -->
<hkern u1="A" u2="V" k="20" />
2.10.2 使用字体
<font>
  <font-face font-family="Super Sans" />
  <!-- and so on -->
</font>

<text font-family="Super Sans">My text uses Super Sans</text>
2.10.3 引用字体
<!-- 引用(远程)字体 -->
<font id="Super_Sans">
  <!-- and so on -->
</font>

<style type="text/css">
@font-face {
  font-family: "Super Sans";
  src: url(#Super_Sans);
}
</style>

<text font-family="Super Sans">My text uses Super Sans</text>
<!-- 引用远程字体 -->
<font>
  <font-face font-family="Super Sans">
    <font-face-src>
      <font-face-uri xlink:href="fonts.svg#Super_Sans" />
    </font-face-src>
  </font-face>
</font>
2.11 基本操作 API
-
创建图形 -
document.createElementNS(ns, tagName) -
添加图形 -
document.appendChild(childElement) -
设置属性 -
document.setAttribute(name, value)&document.getAttribute(name)