Canvas
目录
1.1 基础
<cnavas width="1024" height="768"></canvas>
不建议使用 css 的方式设置 Canvas 的大小,而是直接使用
widthheight属性
<canvas id="canvas">
    <!-- 处理兼容性问题(方法一)
        只有在不兼容的浏览器上才会显示 Canvas 标签内的内容 -->
    您的浏览器不支持 Canvas
</canvas>

<script>
    var canvas = document.getElementById("canvas")

    // 也可以使用这种方式设置 Canvas 的大小
    canvas.width = 1027
    canvas.heiht = 768

    // 解决兼容性问题(方法二)
    if (canvas.getContext('2d')) {
        // 兼容
    } else {
        // 不兼容
    }

</script>
2.1 context
var context = canvas.getContext("2d")
原点:Canvas 左上角为
x 轴正向:水平向右
y 轴正向:竖直向下
2.1.1 绘制直线
Canvas中的绘图是状态设置 - 先设置状态,再绘制
// moveTo (将画笔)移动到(x, Y)
context.moveTo(
    X,x 轴
    y, y 轴
)

// lineTo (从上一个点)链接到(x, Y)
context.lineTo(
    X,x 轴
    y, y 轴
)

context.lineWidth // 线条宽度
context.strokeStyle // 绘制样式
context.stroke() // 绘制
context.moveTo(100, 100) // 将画笔放到 100,100
context.lineTo(700, 700) // 将画笔移动到 700,700
context.lineWidth = 5 // 设置线条的宽度
context.strokeStyle = "#005588" // 设置线条的颜色

context.stroke() // 绘制线条
2.1.2 绘制简单图形
// beginPath
context.beginPath() // 开始
// closePath
// 如果在非封闭图形使用 closePath, 会自动将图形封闭
context.closePath() // 结束
// fill
// 如果在非封闭图形使用 fill, 会自动将图形封闭
context.fillStyle // 填充样式
context.fill() // 填充
beginPath()与lineTo(x, y)同时使用时,相当于moveTo(x, y)
beginPath&closePath不总是成对出现
一般采用
beginPath和closePath相结合绘制封闭图形,如果使用lineTo绘制封闭图形会产生暇疵(在lineWidth不为 1 时),而使用closePath就不会有这个问题 绘制封闭图形
在使用
fillStyle同时使用strokeStyle时,应先使用fillStyle填充颜色再使用strokeStyle绘制边框,否则fillStyle会将一半边框宽度的区域填充 绘制填充图形
绘制出来的线条均为黑色,这是因为 canvans 绘图是基于状态的,靠后的样式会覆盖前面的样式
context.moveTo(100, 100) // 将画笔放到 100,100
context.lineTo(700, 700) // 将画笔移动到 700,700
context.lineTo(100, 700)
context.lineTo(100, 100)

context.lineWidth = 5 // 设置线条的宽度
context.strokeStyle = "#005588" // 设置线条的颜色(可使用 css 的属性设置)
context.stroke() // 绘制线条

context.fillStyle = 'red' // 填充样式
context.fill() // 填充

context.moveTo(200, 100)
context.lineTo(700, 600)

context.strokeStyle = "black"
context.stroke()
使用 beginPath 和 closePath 就可以解决上面的问题,区分状态
context.beginPath() // 开始
context.moveTo(100, 100) // 将画笔放到 100,100
context.lineTo(700, 700) // 将画笔移动到 700,700
context.lineTo(100, 700)
context.lineTo(100, 100)
// 当绘制的图形不是一个封闭的图形时使用 closePath 会自动将图形的首尾相连形成一个封闭的图形
context.closePath() // 结束

context.lineWidth = 5 // 设置线条的宽度
context.strokeStyle = "#005588" // 设置线条的颜色(可使用 css 的属性设置)

context.stroke() // 绘制线条

context.beginPath() // 开始
context.moveTo(200, 100)
context.lineTo(700, 600)
context.closePath() // 结束

context.strokeStyle = "black"

context.stroke()
2.1.3 绘制矩形
// 规划矩形的路径
context.rect(
  x, // 矩形的顶点横坐标
  y, // 矩形的顶点纵坐标
  width, // 矩形的宽度
  height, // 矩形的高度
)
// 绘制填充矩形(不需要 rect 方法)
context.fillRect(
  x, // 矩形的顶点横坐标
  y, // 矩形的顶点纵坐标
  width, // 矩形的宽度
  height, // 矩形的高度
)
// 绘制矩形边框(不需要 rect 方法)
context.strokeRect(
  x, // 矩形的顶点横坐标
  y, // 矩形的顶点纵坐标
  width, // 矩形的宽度
  height, // 矩形的高度
)
// 使用 rect 绘制矩形
context.beginPath()
context.rect(200, 50, 500, 200)
context.closePath()
context.strokeStyle = 'red'
context.stroke()

// 使用 fillRect 绘制矩形
context.fillStyle = 'green'
context.beginPath()
context.fillRect(200, 300, 500, 200)
context.closePath()

// 使用 strokeRect 绘制矩形
context.strokeStyle = 'blue'
context.beginPath()
context.strokeRect(200, 550, 500, 200)
context.closePath()
2.1.4 线条属性
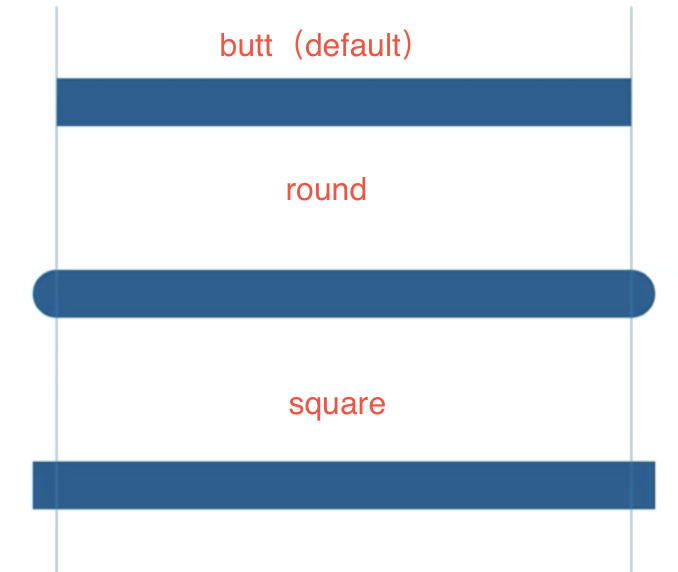
lineWidth- 线条宽度lineCap- 线条两端的样式(只能用于线段的开始处和结尾处,不能用于连接处)- butt(default)
- round
- square
- lineJoin - 线条相交时的样式
- miter(default)尖角 - miterLimit: 10(default)限制 miter
- bevel 斜接
- round 圆角
2.1.5 样式属性
fillStyle:  color - css 颜色表示形式
            grandient - createLinearGradient(线性渐变色)、createLinearGradient(镜像渐变色)
            image - 图片(使用 createPattern)
            Canvas - 另一个 Canvas(使用 createPattern)
            video - 视频(使用 createPattern)
以上方式均可用于
strokeStyle
2.1.5.1 渐变色填充
线性渐变
// 线性渐变
var grd = context.createLinearGradient(
  xStrat,
  yStrat,
  xEnd,
  yEnd,
)
// 关键色
grd.addColorStop(
  stop,
  color,
)
var grd = context.createLinearGradient(0, 0, 800, 800)
grd.addColorStop(0.0, '#fff')
grd.addColorStop(1.0, '#000')
context.fillStyle = grd
镜像渐变
// 镜像渐变
var grd = context.createRadialGradient(
  x0,
  y0,
  r0,
  x1,
  y1,
  r1,
)
// 关键色
grd.addColorStop(
  stop,
  color,
)
var grd = context.createRadialGradient(250, 250, 50, 250, 250, 400)
grd.addColorStop(0.0, '#fff')
grd.addColorStop(1, '#003300')
context.fillStyle = grd
图片填充
// 图片填充
var pattern = context.createPattern(
  image, // 1. javascript image 对象
        // 2. 另一个 Canvas 对象
        // 3. video 对象
  repeat-dtyle: no-repeat // 不重复
                repeat-x // 延 x 轴重复
                repeat-y // 延 y 轴重复
                repeat // 延 x 轴、y 轴重复
)
var img = new Image()
img.src = 'imag.png'
img.onload = function() {
  var pattern = context.createPattern(img, 'no-repeat')
}
2.1.6 图形变换
- 位移 translate( x, y ) - 移动原点
- 旋转 rotate( deg )
- 缩放 scale( sx, sy )
translate是叠加的
context.save() // 保存 Canvas 当前的状态
context.restore() // 还原上一次 save 时 Canvas 的状态
save和restore总是成对出现,这样就可以解决translate叠加的问题
transform(a, b, c, d, e, f)变换矩阵 -transform(1, 0, 0, 1, 0, 0)(default) 表示不改变图形
transform是会叠加的
setTranform(a, b, c, d, e, f)可忽略之前的所有变换
a c e   1 0 0
b d f - 0 1 0 (default)
0 0 1   0 0 1

a, d - 水平、垂直缩放
b, c - 水平、垂直倾斜
e, f - 水平、垂直位移
2.1.7 绘制弧线
// arc
context.arc(
    centerX, centerY // 圆心的坐标
    radius, // 圆的半径
    startingSngle, endingAngle, // 弧线开始和结束的位置(弧度)
    anticlockwise = false, // 可选,false: 顺时针绘制(默认),true:逆时针绘制
)
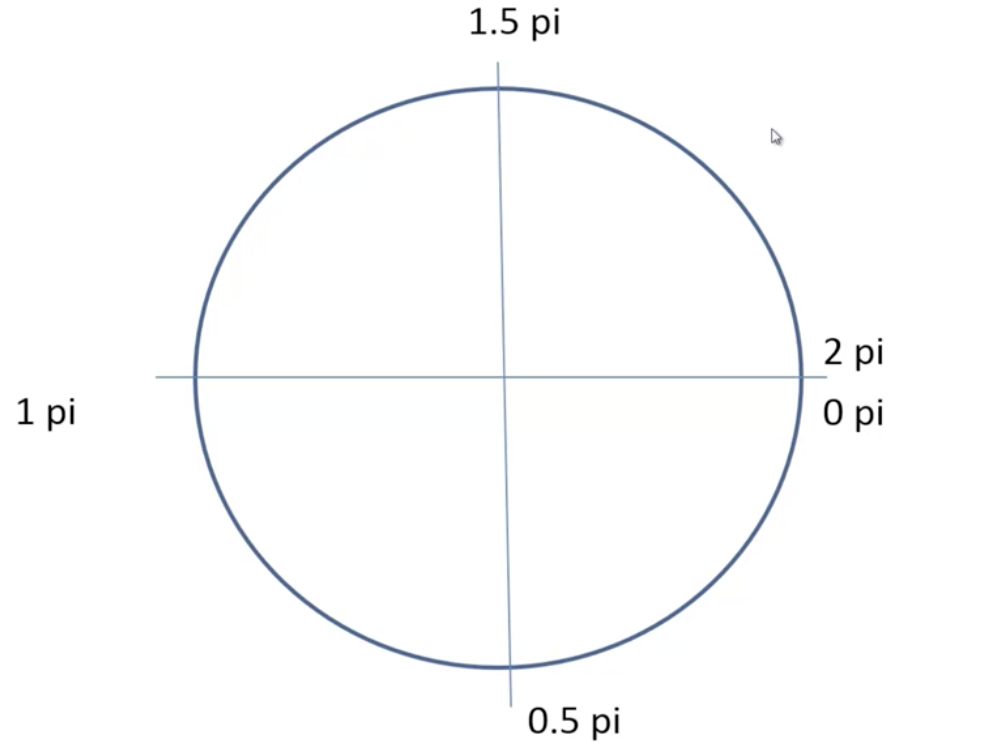
startingSngle 和 endingAngle 的进一步说明
// 顺时针
context.arc(300, 300, 200, 0, 1.5 * Math.PI)

context.lineWidth = 5
context.strokeStyle="#005588"

context.stroke()

// 逆时针
context.arc(300, 300, 200, 0, 1.5 * Math.PI, true)

context.lineWidth = 5
context.strokeStyle="#005588"

context.stroke()
// arcTo
context.arc(
    x1, y1 // 第一个圆的圆心(第一个控制点)
    x2, y2, // 第二个圆的圆心(第二个控制点)
    radius, // 圆的半径
)
context.beginPath()
context.moveTo(150, 150)
context.arcTo(650, 150, 650, 650, 300)

context.lineWidth = 5
context.storkeStyle = 'red'
context.stroke()
2.1.8 贝塞尔曲线
贝塞尔曲线 - Wikipedia
Bézier curve - Wikipedia
深入理解贝塞尔曲线 - 知乎
2.1.8.1 二次贝塞尔曲线
// 二次贝塞尔曲线
context.moveTo(x0, y0) // (x0, y0) 曲线的起始点
context.quadraticCurveTo(
  x1, y1, // (x1, y1) 曲线的控制点
  x2, y2, // (x2, y2) 曲线的终止点
)
2.1.8.2 贝塞尔三次曲线
// 贝塞尔三次曲线
context.moveTo(x0, y0) // (x0, y0) 曲线的起始点
context.bezierCurveTo(
  x1, y1, // (x1, y1) 曲线的控制点
  x2, y2, // (x2, y2) 曲线的控制点
  x3, y3, // (x3, y3) 曲线的终止点
)
2.1.9 文字渲染
// 文字渲染基础
context.font = 'bold 40px Arial'
context.fillText(string, x, y, [maxLen])

context.font = 'bold 40px Arial'
context.strokeText(string, x, y, [maxLen])
context.font = 'bold 40px arial'
context.fillStyle = '#058'
context.fillText('Hello World!', 40, 400)

context.lineWidth = 5
context.strokeStyle = '#058'
context.strokeText('I can show string in Canvas', 40, 200)

context.fillText('It is toooooooooooooooo long!', MARGIN_LEFT, MARGIN_TOP + 40*(RADIUS+1) + 100, 550)
2.1.9.1 字体绘制
// font - 与 css 中 font 的设置一致
context.font = // 20px sans-serif (default)
  font-style // 字体样式
    - normal  (default)
    - italic  (斜体 - 字体会有专门的斜体字)
    - oblique (倾斜字体 - 将文字倾斜,不会使用字体的斜体字)
  font-variant
    - normal      (default)
    - small-caps  (以小型的大写字母显示小写字母 - 使用英文小写字母时才有作用)
  font-weight // 粗细
    - normal  (debault - 400)
    - bold (粗体 - 700)
    - ligter (细 - 支持不佳)
    - bolder (粗 - 支持不佳)
    - 100 | 200 | 300 | 400 | 500 | 600 | 700 | 800 | 900(支持不佳)
  font-size // 字号
    - 30px | .5em | 150%
    - xx-small | x-small | medium | large | x-large | xx-large
  font-family // 字体
    - 设置多种备选姿
    - #font-face
    - web 安全字体
2.1.9.2 文本对齐
// 文本横向对齐 - 与 css 中 text-align 的设置一致
context.textAlign = // left (default)
  - left
  - center
  - right

// 文本纵向对齐
context.textBaseline = // alphabetic (default)
  - top
  - middle
  - bottom
  - alphabetic - 基于拉丁字母的语言
  - ideographic - 基于汉子、日本文字等方块文字
  - hanging - 基于印度语
2.1.9.3 文字测量
context.measureText(string).width // 文字在 canva 中所占宽度
// 在使用前应设置好相应的 font 属性,measureText 会根据 font 属性进行计算
2.2 Canvas 高级内容
2.2.1 阴影
context.shadowColor // 阴影的颜色(与 fillStyle 用法相同)
// 阴影的位移值
context.shadowOffsetX
context.shadowOffsetY
// 阴影的模糊程度(0 为不模糊,数值越大阅模糊)
context.shadowBlur
2.2.2 透明度
// 全局透明度
context.globalAlpha = 1 (default)
2.2.3 重叠
// 重叠
context.globalCompositeOperation =
  - 'source-over' (后绘制的图形覆盖之前绘制的图形 default)
  - 'source-atop'
  - 'source-in'
  - 'source-out'
  - 'destination-over' (之前绘制的图形覆盖之后绘制的图形)
  - 'destination-atop'
  - 'destination-in'
  - 'destination-out'
  - 'lighter'
  - 'copy'
  - 'xor'
CanvasRenderingContext2D.globalCompositeOperation - MDN
2.2.4 剪辑区域
context.clip()
2.2.5 非0环绕原则
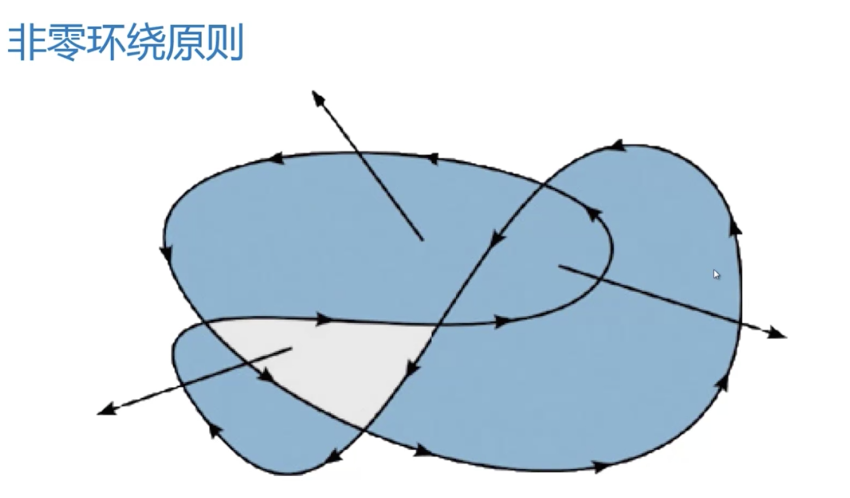 非0环绕原则
如图,设定一个方向为 正, 一个方向为 负,从一个点引出一条直线,当直线与 正 方向相交记 1,当家头与 负 方向相交记 -1,将所有相交的记录的值求和,当和不为 0 则表示引出该直线的点在图像内部,反之为图像外部。
2.2.6 清空
context.clearRect(x, y, width, height) // 对指定区域进行清空操作
2.2.7 点击检测
context.isPointInPath(x, y) // 点击检测
// 获取 canva 中鼠标点击位置
var x = event.clientX - canvas.getBoundingClientRect().left
var y = event.clientY - canvas.getBoundingClientRect().top
2.2.8 扩充 context
以下两种方式实现的图形相同,第二种方式调用时更简洁也更符合 context 的规范,但不建议直接复写 context 的方法(以下方式为直接复写 context 的 moveTo 方法),而是定义自己的上下文环境
// 方式一
CanvasRenderingContext2D.prototype.fillStar = fucntion (x, y, r, R, rot = 0) {
  this.beginPath()
  for (var i = 0, i < 5; i++) {
    this.linkTo(
      Math.cos( (18 + i*72 - rot)/180 * Math.PI ) * R + x,
      -Math.sin( (18 + i*72 - rot)/180 * Math.PI ) * R + y )
    this.linkTo(
      Math.cos( (54 + i*72 - rot)/180 * Math.PI ) * r + x,
      -Math.sin( (54 + i*72 - rot)/180 * Math.PI ) * r + y )
  }
  this.closePath()

  this.fill()
}

context.fillStar(400, 400, 400, 300)
// 方式二
var originalMoveTo = CanvasRenderingContext2D.prototype.moveTo
CanvasRenderingContext2D.prototype.lastMoveToLoc = {}

CanvasRenderingContext2D.prototype.moveTo = function (x, y) {
  orignalMoveTo.apply( context, [x, y] )

  this.lastMoveToLoc.x = x
  this.lastMoveToLoc.y = y
}

CanvasRenderingContext2D.prototype.fillStar = fucntion (r, R, rot = 0) {
  this.beginPath()
  for (var i = 0, i < 5; i++) {
    this.linkTo(
      Math.cos( (18 + i*72 - rot)/180 * Math.PI ) * R + this.lastMoveToLoc.x,
      -Math.sin( (18 + i*72 - rot)/180 * Math.PI ) * R + this.lastMoveToLoc.y )
    this.linkTo(
      Math.cos( (54 + i*72 - rot)/180 * Math.PI ) * r + this.lastMoveToLoc.x,
      -Math.sin( (54 + i*72 - rot)/180 * Math.PI ) * r + this.lastMoveToLoc.y )
  }
  this.closePath()

  this.fill()
}

context.moveTo(400, 400)
context.fillStra(400, 300)
2.3 Canvas 图像处理
2.3.1 Canvas 图像基础
// 第一种方式
context.drawImage(
  image, // javascript image 对象 或者 canvas 对象
  dx, dy, // 图像凯斯的坐标
  dw, dh // 绘制图像的宽和高
)
如果只传入三个参数(image, dx, dy)Canvas 不会对图像进行缩放处理,超出 Canvas 画布部分会被裁剪
如果传入绘制的尺寸(dw, dh)Canvas 会对图像进行缩放
var image = new Image()
image.src = 'img/001.jpg'
image.onload = function () {
  // 必须在 image 的 onload 中调用 drawImage
  context.drawImage( img, 0, 0 )
}
// 第二种方式
context.drawImage(
  image, // javascript Image 对象 或者 canvas 对象
  sx, sy, sw, sh, // 取愿图像的范围(一部分)
  dx, dy, dw, dh // 绘制到 Canvas 画布的范围(显示取到的图像的 canvas 画布的指定区域)
)
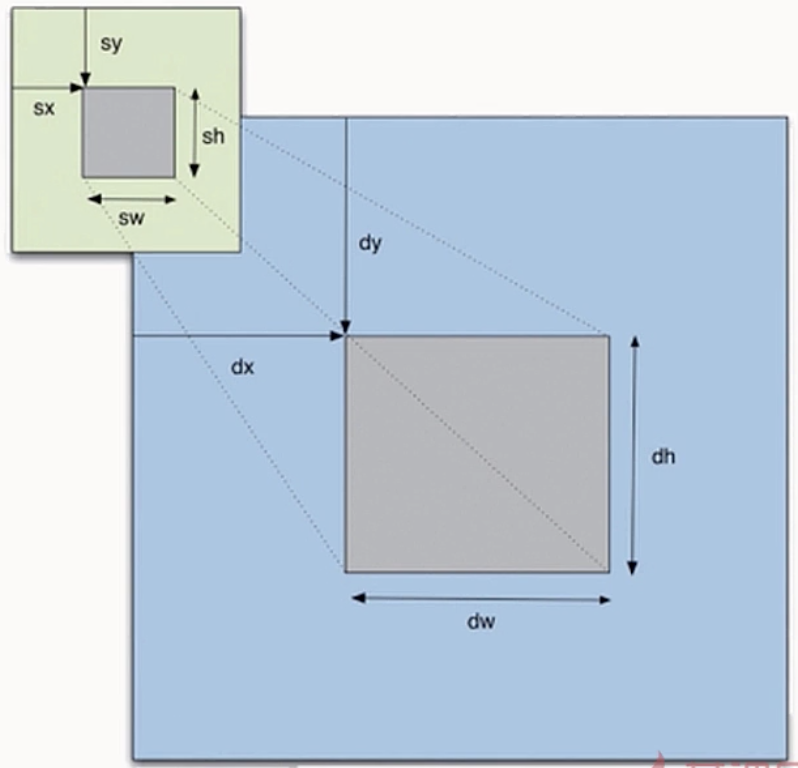 context.drawImage(
image, sx, sy, sw, sh, dx, dy, dw, dh
)
2.3.2 离屏 Canvas
2.3.3 Canvas 进行像素级操作
// 获取 image 的像素信息
imageData = context.imageData(x, y, width, height)

imageData 对象
  - width
  - height
  - data // 图像的像素信息
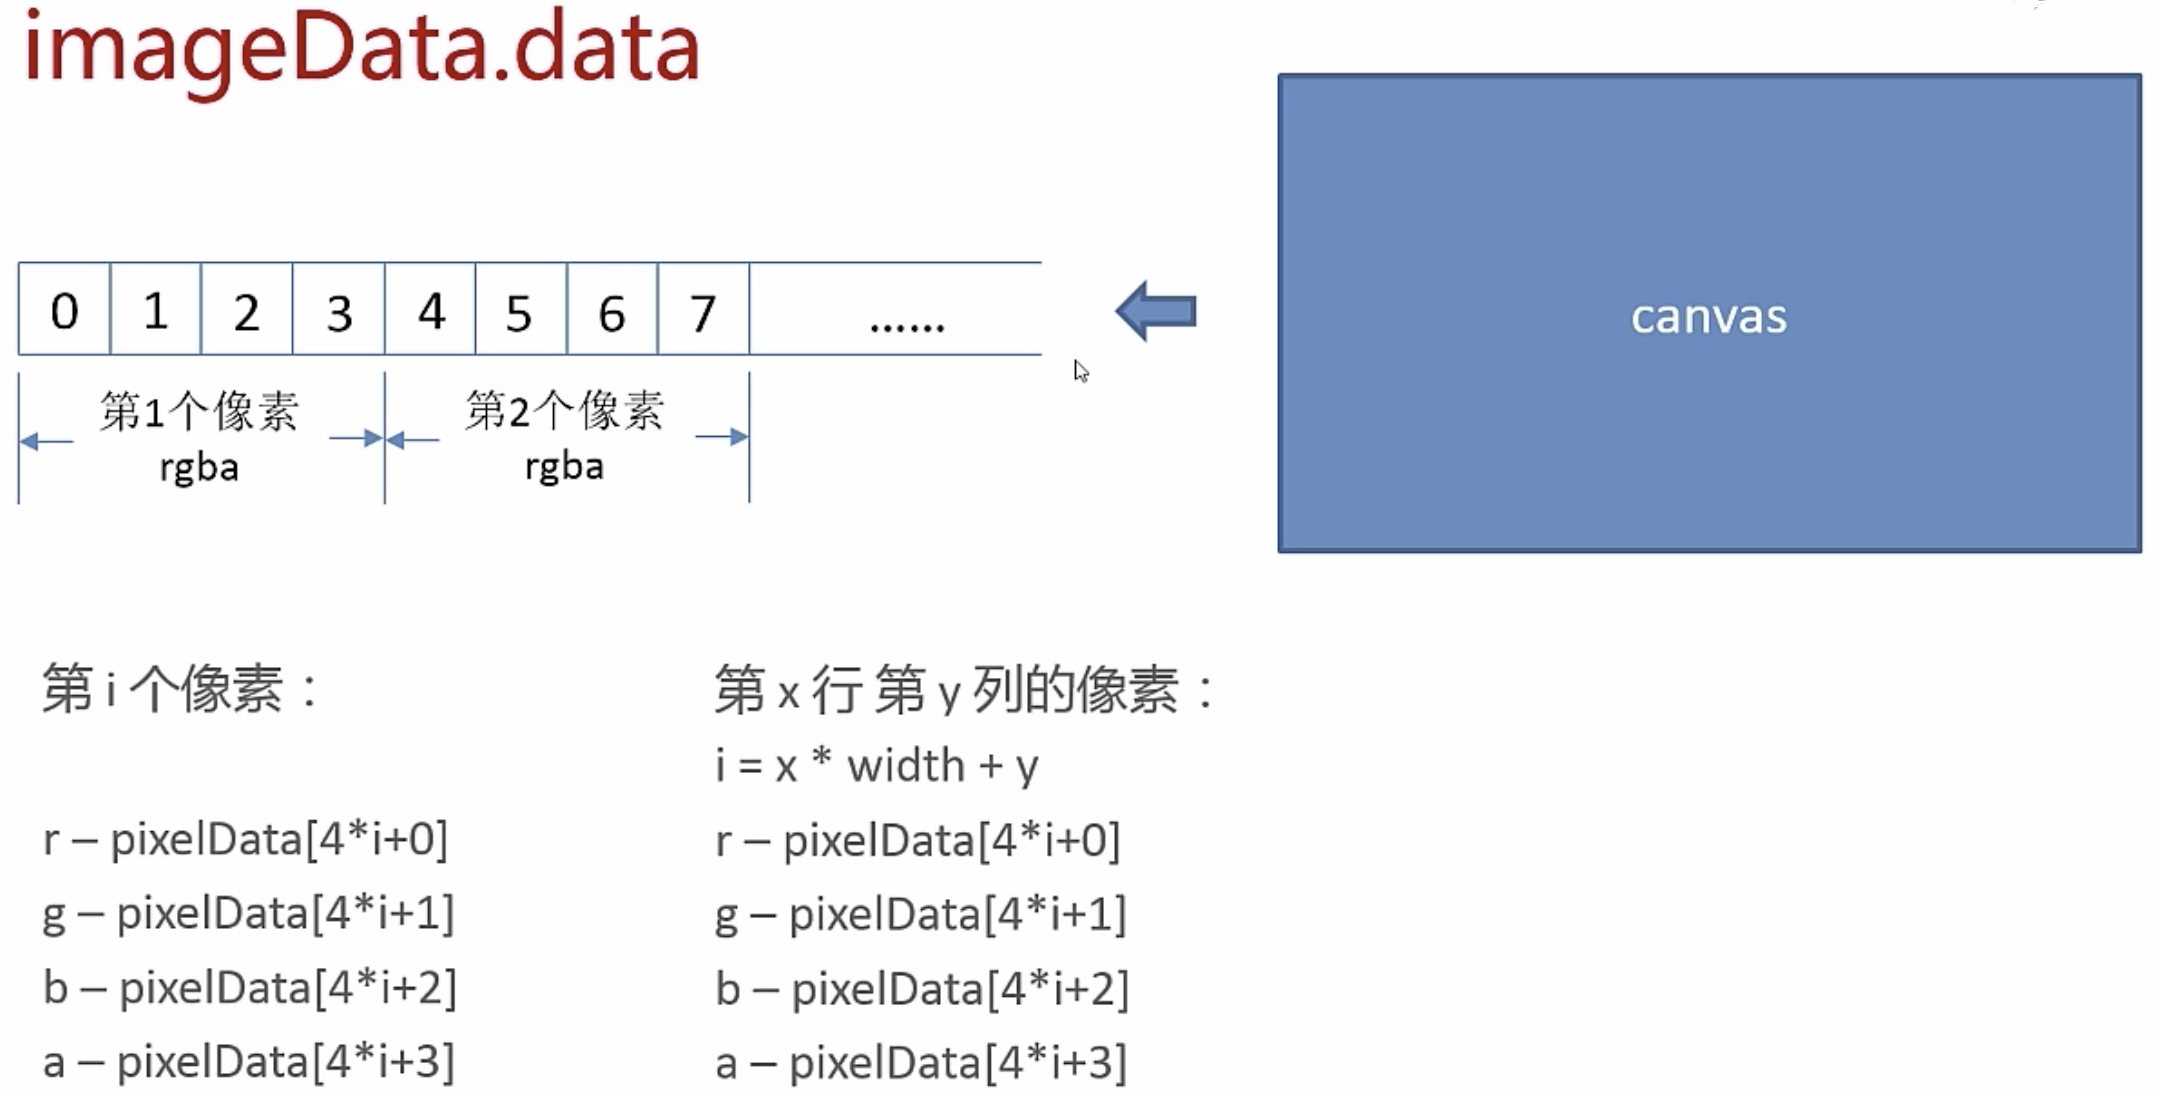 imageData.data
// 将 imageData 放入 Canvas 中
context.putImageData(
  imageData, // 图像的像素信息
  dx, dy, //
  dirtyX, dirtyY, // 会累计到 dx, dy
  dirtyWidth, dirtyHeigh
)
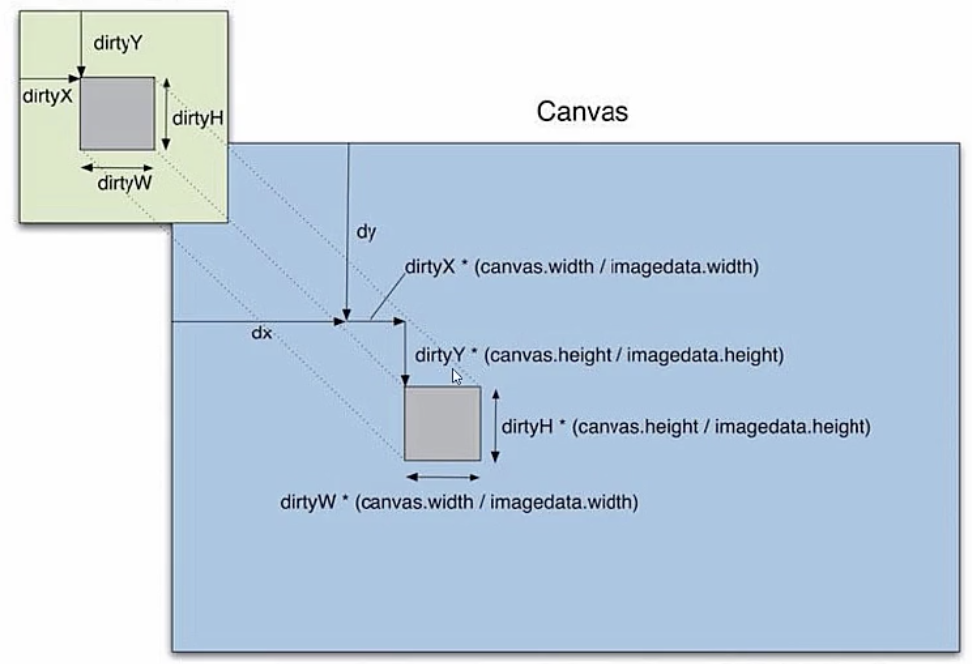 context.putImageData( imageData, dx, dy, dirtyX, dirtyY, dirtyW, dirtyH )
2.3.4 创建 imageData
imageData = context.createImageDate(
  width, height
)
Canvas Demo 拓展 - 数字时钟
Canvas Demo 学写一个字
Canvas Demo 模糊效果
兼容性:explorerCanvas - 可兼容 ie 6、7、8等浏览器
<!--[if IE]><script type="text/javascript" src="../excanvas.js"></script><![endif]-->
Canvas 图形库
参考:
推荐:
- Canvas API中文文档首页地图
- css3 filter - 对图像的处理
鸣谢:
感谢 liuyubobobo 的课程